Page 1 of 2 12 LastLast
Results 1 to 10 of 14

the eyes have it

This is a discussion on the eyes have it within the General photography forums, part of the Photography & Fine art photography category; My question is: I know that you say to make the eyes sing. How do I do that? As it ...

  1. #1
    tomorrowstreasures is offline Senior Member
    Join Date
    Aug 2008
    Location
    Midwest - USA
    Posts
    1,940
    My Photos
    Please ask before editing my photos

    Question the eyes have it

    My question is: I know that you say to make the eyes sing. How do I do that? As it is, I hand hold the camera. I use the auto focus on my canon 5d usm lens. i hold my breath... i finally went out and got a monopod to help, but when i shoot vertical. i am being rude and dangerous. I have tried to set the lens on manual. that makes it worse as most of what i enjoy photographing isn't yet 4 feet tall and moves constantly. (My grandson is really Tigger in a cute kid disguise....boing, boing, boing...)

  2. #2
    tegan is offline Senior Member
    Join Date
    Jan 2007
    Location
    Canada
    Posts
    948

    Default

    Quote Originally Posted by tomorrowstreasures View Post
    My question is: I know that you say to make the eyes sing. How do I do that? As it is, I hand hold the camera. I use the auto focus on my canon 5d usm lens. i hold my breath... i finally went out and got a monopod to help, but when i shoot vertical. i am being rude and dangerous. I have tried to set the lens on manual. that makes it worse as most of what i enjoy photographing isn't yet 4 feet tall and moves constantly. (My grandson is really Tigger in a cute kid disguise....boing, boing, boing...)
    There are a number of approaches.

    1. Put on a polarizer or ND filter and then use fill flash. If the flash photo is
    overexposed, then set the ISO at 100 or lower on some cameras and of
    course you can go toward f.22 in aperture. A polarizer with flash will help
    make the light from the flash less harsh. A tissue over the flash to diffuse
    the light works too.

    2. On a very bright day, use refectors in the environment such as water,
    glass, a brightly coloured building, sidewalk, sand, a white car etc. but use
    the spot meter function to expose for his face amd not the bright
    environment.

    3. Artificial reflectors work in some situations. Although you can buy them at
    a photo store, you can also be creative and make one. Gold foil works
    best over a good size piece of cardboard. If you use silver foil wrap, make
    sure that you adjust colour so that it is not too cool (toward blue).

    4. Postprocessing is often necessary to get the eyes correct as well. I have
    seen many outdoor shots where the white of the eyes is more blue than
    white. The eyes may also need to be selectively brightened to bring out
    the colour hidden by shade etc. Red veins, rims, bloodshot eyes etc. also
    need to be corrected too.

    Tegan
    "Photographic art requires the technical aspects of photography and the design aspects of art, both at an outstanding level."

  3. #3
    Travis is offline Senior Member
    Join Date
    Mar 2008
    Location
    Huntsville Muskoka
    Posts
    678

    Default

    I use a combination of Garry Fong difuser, reflector, and/or bounce flash depending on environment...

    The Fong works very well....


    edit: if your camera has assignable function buttons than assigning "spot meter" to it and aiming for the shadowed portion of the eye helps...
    ______________________

    Nikon D300, Nikkor 24-70 2.8 . Nikkor 70-200 2.8 . Nikkor 50mm 1.8 . Sigma 105mm 2.8 . Tokina 12-24 4 . SB-600 . 2xVivitar 285

  4. #4
    mindforge is offline Senior Member
    Join Date
    Sep 2008
    Location
    Visalia, CA
    Posts
    330

    Default

    Bounce Flash and post processing.

    Get a LED flash light and create a snoot for it that is pencil thin.. then have an assistant hold it for you... nah, just kidding... just use bounce flash and curves adjustment layer... make sure the edge of the color part of the eye a little darker.

  5. #5
    tomorrowstreasures is offline Senior Member
    Join Date
    Aug 2008
    Location
    Midwest - USA
    Posts
    1,940
    My Photos
    Please ask before editing my photos

    Default

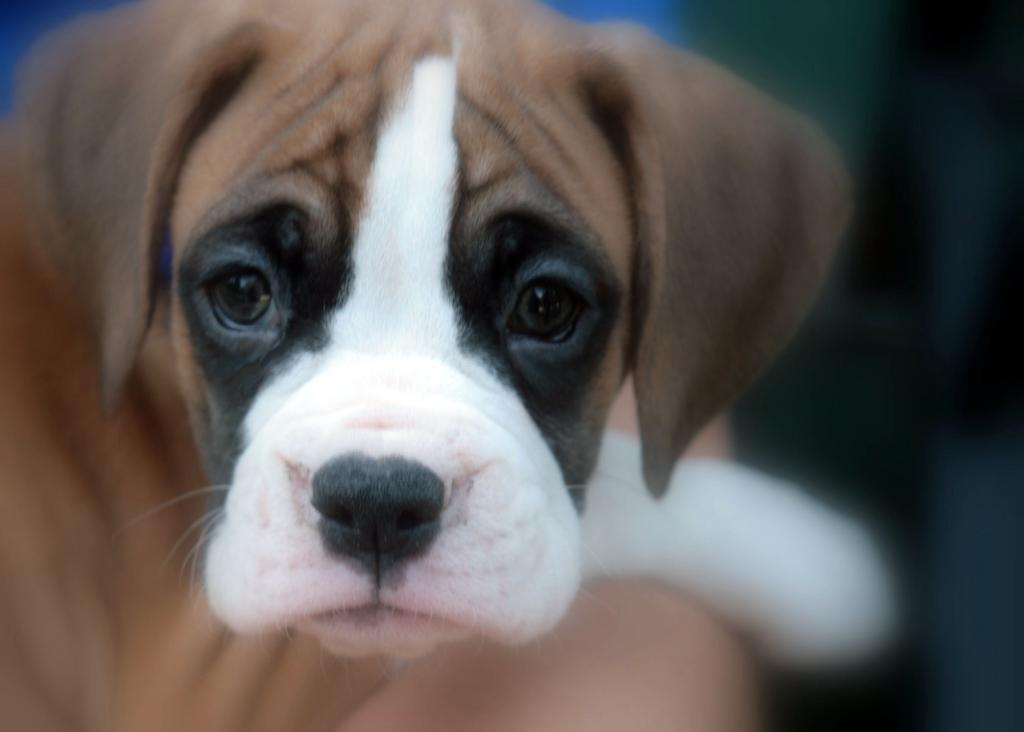
    Here is my new grand puppy... i doctored the shot a bit... and purposefully added the soft focus so only the face was in focus to get the effect that I wanted. That aside, here is a shot taken with my 5D 50 mm lens, I think. I had my Sony p&s cyber shot with me as well.
    I feel that I am improving with that a LITTLE bit, but more practice is needed for sure.
    BTW= this little guy is Marley after Bob Marley 8wks old boxer and adorable personality!
    Name:  IMG_7447m.jpg
Views: 939
Size:  41.6 KB

    edit: Just posted and saw photo ... the eyes aren't nearly as sharp as they are when the image is much smaller in the desk top file. Yikes!
    Last edited by tomorrowstreasures; 09-22-2008 at 10:23 PM. Reason: saw photo and needed to comment

  6. #6
    tomorrowstreasures is offline Senior Member
    Join Date
    Aug 2008
    Location
    Midwest - USA
    Posts
    1,940
    My Photos
    Please ask before editing my photos

    Default

    Sheesh - the main purpose I wanted to reply was to thank you guys for the great tips! And then, I go and post a blurry picture. sorry bout that!
    time for bed..g'night.

  7. #7
    tegan is offline Senior Member
    Join Date
    Jan 2007
    Location
    Canada
    Posts
    948

    Default

    With freehand selection circle the first eye, then hold down the space key and circle the second eye. Go to Contrast and brightness in the pull down menu and you can brighten the eyes and bring out the highlights.

    Tegan
    "Photographic art requires the technical aspects of photography and the design aspects of art, both at an outstanding level."

  8. #8
    mindforge is offline Senior Member
    Join Date
    Sep 2008
    Location
    Visalia, CA
    Posts
    330

    Default

    Tegan's idea is good. There is another way too, the way that I do it. There are lots of ways actually.

    I use a curves adjustment layer to lighten the entire image then hit command +j (ctrl + j on PC) (been using that command so long I don't even know what it is called when it turns black )

    Zoom into the eye, change the brush size to something that fits in the eye, big if you just want to do the whole eye, or small if you want to create a catch light which is possible too. Make sure your hardness is down for the whole eye and up to create a catch light.

    Then flatten it.

    Okay, I like to paint and draw. I love sketching, I think that is why I like this method compared to Tegan's. They both pretty much achieve the same effect and mine takes longer... but I like the way brushing feels when I have my stylus and sometimes I get the pen really small on different adjustment layers for lighter and darker parts of the eye to pop eyes.

  9. #9
    tegan is offline Senior Member
    Join Date
    Jan 2007
    Location
    Canada
    Posts
    948

    Default

    By the way, I just adore boxers! I grew up with one that was part of the family and very energetic and funny.

    Tegan
    "Photographic art requires the technical aspects of photography and the design aspects of art, both at an outstanding level."

  10. #10
    Marko's Avatar
    Marko is offline Administrator
    Join Date
    May 2005
    Location
    Montreal, QC. Canada
    Posts
    14,870
    My Photos
    Please do NOT edit my photos
    Critiques
    Critique my photos anywhere in the forum

    Default

    Tegan and MF have good suggestions for the brightness, but your instinct was bang on TT, the dog image and the dog's eyes are blurry.
    For me, that means it's an image killer.... or it's time to play and turn it into something vastly different.

    GORGEOUS dog though - ooooozing sweet cuteness.
    Last edited by Marko; 09-26-2008 at 12:05 PM.
    - Please connect with me further
    Photo tours of Montreal - Private photography courses
    - Join the new Photography.ca Facebook page
    - Follow me on Twitter http://twitter.com/markokulik
    - Follow me on Google+ https://plus.google.com/u/0/111159185852360398018/posts
    - Check out the photography podcast


    "You have to milk the cow quite a lot, and get plenty of milk to get a little cheese." Henri Cartier-Bresson from The Decisive Moment.

Page 1 of 2 12 LastLast

Bookmarks

Posting Permissions

  • You may not post new threads
  • You may not post replies
  • You may not post attachments
  • You may not edit your posts
  •  

1 2 3 4 5 6 7 8 9 10 11 12 13 14 15 16 17 18 19 20 21 22 23 24 25 26 27 28 29 30 31 32 33 34 35 36