Results 1 to 7 of 7

Challenge: How to do this properly?

This is a discussion on Challenge: How to do this properly? within the Digital photography forums, part of the Photography & Fine art photography category; Hi everyone! The other night the moon was rising above this mountain, (in case you are curious, it is called ...

  1. #1
    fsendel's Avatar
    fsendel is offline Member
    Join Date
    Nov 2008
    Location
    Monterrey, Mexico
    Posts
    37
    My Photos
    Please feel free to edit my photos

    Default Challenge: How to do this properly?

    Name:  324926_10151154716424328_1286878702_o.jpg
Views: 429
Size:  32.4 KB

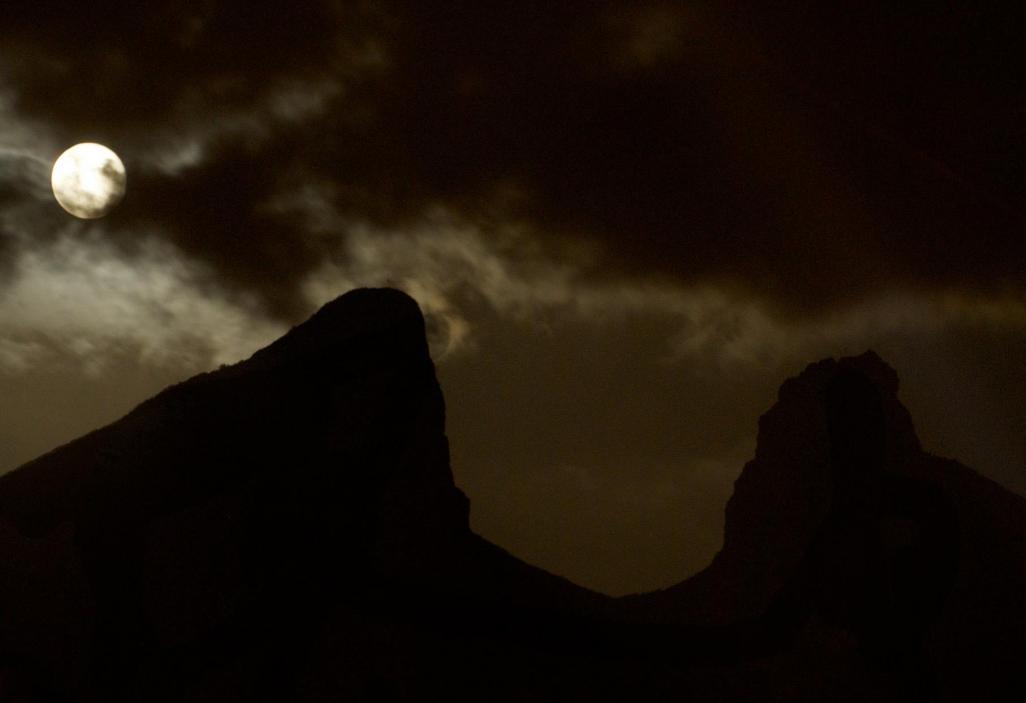
    Hi everyone! The other night the moon was rising above this mountain, (in case you are curious, it is called the "cerro de la silla", it is the symbol of Monterrey), so I thought I would try to capture it. I tried with many different settings and could not get it as I wanted. At the end this is the best I achieved. I just could not find a balance between aperture and shutter speed in order to get the moon to be sharper. If I tried a faster shutter speed, it was too dark. Any ideas on how this could have been done?

    Thanks!

  2. #2
    Matt K.'s Avatar
    Matt K. is offline Senior Member
    Join Date
    Feb 2010
    Location
    Calgary, AB
    Posts
    3,547
    My Photos
    Please ask before editing my photos
    Critiques
    Critique my photos anywhere in the forum

    Default

    It is tough, since I am sure the clouds were moving. This changes the whole light situation in shots like this. I think you have done very well with your image. If you boost the ISO you may be able to use faster shutter speed (at the expense of grain, though). I hear Nikon makes a camera body where ISO is ridiculously high, without much of an effect on the image as far as grain is concerned ...
    ~~ Beauty is in the eye of the beer holder ~~

  3. #3
    Iguanasan's Avatar
    Iguanasan is offline Moderator
    Join Date
    Jan 2009
    Location
    Halifax, NS
    Posts
    10,917
    My Photos
    Please feel free to edit my photos
    Critiques
    Critique my photos anywhere in the forum

    Default

    The only reasonable way to do this and get a crisp sharp moon is through the use of some form of HDR. The moon is reflected sunlight and as such is extremely bright. The mountain, at night, is extremely dark. There are no settings on pretty much any camera that will get both properly exposed. What you need to do is take one shot to expose the mountains and take one shot to expose the moon and combine them in post processing either manually through the use of layers in something like Photoshop or Gimp or "automagically" through the use of HDR software which does it through tone mapping.

    I hope this helps.
    “If you are out there shooting, things will happen for you. If you’re not out there, you’ll only hear about it.” – Jay Maisel
    ~~~~~~~~~~~~~~~~~~~~~~~~~~~~~~~~~~~~~~~
    Feel free to edit my shots ONLY for use on this forum and critique my shots in ANY discussion area.
    Flickr | Blog | Google+

  4. #4
    fsendel's Avatar
    fsendel is offline Member
    Join Date
    Nov 2008
    Location
    Monterrey, Mexico
    Posts
    37
    My Photos
    Please feel free to edit my photos

    Thumbs up Thanks!

    Quote Originally Posted by Iguanasan View Post
    The only reasonable way to do this and get a crisp sharp moon is through the use of some form of HDR. The moon is reflected sunlight and as such is extremely bright. The mountain, at night, is extremely dark. There are no settings on pretty much any camera that will get both properly exposed. What you need to do is take one shot to expose the mountains and take one shot to expose the moon and combine them in post processing either manually through the use of layers in something like Photoshop or Gimp or "automagically" through the use of HDR software which does it through tone mapping.

    I hope this helps.

    Thank you Iguanasan. This makes sense.

  5. #5
    Marko's Avatar
    Marko is offline Administrator
    Join Date
    May 2005
    Location
    Montreal, QC. Canada
    Posts
    14,870
    My Photos
    Please do NOT edit my photos
    Critiques
    Critique my photos anywhere in the forum

    Default

    I agree with Iggy here - HDR.
    The only issue might be that clouds will move position between exposures so it's harder to predict if you'll appreciate the final blended outcome... My guess is you will tho.
    If you do try - of course we wanna see the results.
    - Please connect with me further
    Photo tours of Montreal - Private photography courses
    - Join the new Photography.ca Facebook page
    - Follow me on Twitter http://twitter.com/markokulik
    - Follow me on Google+ https://plus.google.com/u/0/111159185852360398018/posts
    - Check out the photography podcast


    "You have to milk the cow quite a lot, and get plenty of milk to get a little cheese." Henri Cartier-Bresson from The Decisive Moment.

  6. #6
    JAS_Photo's Avatar
    JAS_Photo is offline Senior Member
    Join Date
    Sep 2008
    Location
    Calgary
    Posts
    7,359
    My Photos
    Please ask before editing my photos
    Critiques
    Critique my photos anywhere in the forum

    Default

    What about using two photos, one exposed for the moon and another exposed for the sky and using masking layers to just bring the moon through?

  7. #7
    edbayani11's Avatar
    edbayani11 is offline Senior Member
    Join Date
    Feb 2009
    Location
    Philippines
    Posts
    347
    My Photos
    Please feel free to edit my photos

    Default

    If you cannot reshoot, try editing it. For the moon, use the oval tool and press shift alt and start from the center and drag until it selects the moon. You can fine tune by choosing select and transform selection to make the selection precise. Press ctrl H to hide the selection and use the clone tool with a small brush and clone from the inside of the moon towards the edge. Deselect. For the mountain, use the magic wand to select the mountain and press Q to enter quickmask. Go to filter and choose sharpen, sharpen edges and do this about 3 or four times to sharpen the edge of the mask. Press Q again to exit quickmask and press ctrl H again to hide selection and do the same, clone the mountain towards the edges.

Bookmarks

Posting Permissions

  • You may not post new threads
  • You may not post replies
  • You may not post attachments
  • You may not edit your posts
  •  

1 2 3 4 5 6 7 8 9 10 11 12 13 14 15 16 17 18 19 20 21 22 23 24 25 26 27 28 29 30 31 32 33 34 35 36