Aperture size and depth of field
When you take a picture, light enters your camera through a ‘hole’. This hole is referred to as the aperture. The size of the hole is referred to as the f-stop. The shutter that we talked about in the last section resides behind the hole or aperture. Like the shutter, the aperture size can (usually) be adjusted. It can be made larger, letting in more light. It can be made smaller, letting in less light. The shutter speed and aperture size in combination with the ISO (the sensitivity of the recording material or the speed of the film if you are using film) is what determines the overall exposure. These f-stop numbers are occasionally written around the lens barrel, and can be seen in the camera’s viewfinder as well. What to do these numbers around the lens mean? They refer to the size of the aperture, how much light is going through the lens, then through an open shutter, and then getting to the digital sensor or film where the scene is recorded.
The aperture (AKA an F-stop) also helps determine depth of field. Depth of what? It’s not as complicated as it sounds. I suggest getting your camera right now and checking the numbers in the viewfinder. The numbers always start out small and get larger i.e. F-1.8, F-2.8, F-4, F-5.6, F-8, F-11, F-16, F-22, F-32. Your lens may not have all of these numbers but it will have some of them. Each number represents the size of the aperture or opening of the lens during the exposure. (Exposure once again, refers to the moment that the light passes through the aperture and the open shutter in order for the image to register on the digital sensor or film). The smaller the number i.e. 1.8 or 2.8, the LARGER the opening of the aperture. The larger the number, the smaller the aperture opening. Although this may seem contrary to logic, think of it this way. Pretend these numbers are all fractions of an inch or a centimeter. In reality these numbers are indeed fractions of the focal length of the lens. So F-22 is SMALLER than F-1.8 because it lets in a smaller fraction of light. A good thing to know is that each successive number lets twice as much light hit the film as the previous one. NOTE:THIS IS THE SAME THEME THAT WAS MENTIONED IN RELATION TO SHUTTER SPEEDS. So F-2.8 lets in twice as much light as F-4. If we go in the other direction F-11 lets HALF the light that F-8 does because F-11 is SMALLER. Ok now that the numbers are out of the way let’s talk practical depth of field.
Depth of field-refers to the overall foreground to background sharpness of your image. This is most strongly determined by the aperture size you choose and how far away you are from whatever the camera is focused on.
Try this exercise: Go look out your window at a scene 50 feet away. Then squint with one eye or make a small circle the size of a pea with your fingers and look through the hole at the scene again. Keep making your finger smaller until the hole is teeny, let’s say the size of a pea. You should notice that as the squint or finger circle gets smaller, the depth or how far you can see gets clearer or sharper. That’s depth of field. And the lens on a camera works the same way. The smaller the aperture F22, F16, the sharper the details in BOTH the foreground and background. The larger the aperture F-1.8, F-2.8, only the element focused on will be sharp. The classic example is a man in a forest. If you focus on the man at 1.8, the man will be sharp but the trees behind him will be out of sharp focus. But at F-22 both the man and the trees behind him will be in focus. The middle apertures will give more depth of field than the large apertures like F-2.8 but less depth of field than the smaller apertures like F-16

F-2.0 A shallow depth of field. Note how the foreground is sharper than the background.

F-16 A large depth of field. Note how both the foreground and background are sharp.
So why do we choose different apertures and not always the smallest or sharpest one? Basically for two reasons: Although the smaller apertures( F16,F22, F32) produce sharper focus from background to foreground, they require more light to achieve proper exposure. This is because the hole that the light passes through in order to hit the recording material is small. If the hole were larger, you would need less light. This is not a problem on a sunny day, but would be a problem on a cloudy day or at night. The second reason for choosing a larger aperture boils down to intent. Even if there is enough light to choose whatever aperture you desire, sometimes you want to ISOLATE the foreground from the background. This is especially useful when taking a portrait. Let’s say we’re talking about that man in the forest again. If we want the viewer to focus on the man, we will choose a larger f-stop. When we look at the resulting image, we will notice that the man is in sharp focus but the background is somewhat blurry. This will cause the viewer of the image to pay more attention to the man and less attention to the trees. If the man is a lumberjack however, and we want to show his environment, then we may wish to choose a smaller aperture (light permitting), and so more of the image from background to foreground will be sharp.
ISO — The sensitivity of the recording material or Film Speed
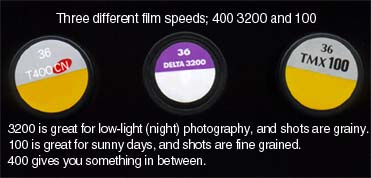
The last element in this trinity is the sensitivity of the recording material known as the ISO. If we are still using film it is known as the film speed or the ASA. What is the difference between ISO 200 and ISO 400 for your digital camera or film camera? You’re gonna love it. AGAIN ITS BACK TO THE SAME THEME AS IN THE PREVIOUS SECTIONS. ISO 200 is twice as sensitive to light as ISO 100. Going in the other direction, ISO 200 is HALF as sensitive as ISO 400 or 400 speed film. The higher the ISO, the less light you need to take the picture. This is why if you are taking indoor shots or shots at night (where there is less light) use a higher ISO or a higher film speed.
In digital photography, higher end cameras can go to ISO 6400 and higher. Film speeds can go as high as 1600 or even 3200. These ISOs are extremely sensitive to light and are therefore often used when the light level is really low. So why not always choose a high ISO, what’s the catch? The catch is in the pixel structure that makes up the digital file or the grain structure of the film that you may still be using. The lower the ISO the finer the pixel structure or grain. The higher the ISO or film speed the more ‘pixelly’ or ‘noisy’ or grainy the image will appear. You might not see it so much in a small image, but if the image is enlarged to 8x10 inches, you can definitely see the difference. Pixelly images or grain aren’t always bad. Many photographers use noise or grain for artistic effects. Most people however, prefer less noise or graininess in their images.

In digital photography or film photography, ISO, or ASA or film speed all refer to the same thing; the sensitivity of the recording material.
Shutter speed — aperture — depth of field — film speed — summary
Based on the ISO, the shutter speed and the aperture, the camera’s light meter will evaluate the scene and produce a proper exposure. This exposure will be an f-stop along with a shutter speed at a given ISO. NOW THAT YOU KNOW SOMETHING ABOUT EXPOSURE, YOU CAN CHOOSE DIFFERENT SHUTTER SPEED/APERTURE COMBINATIONS FOR CREATIVE EFFECTS AND STILL MAINTAIN PROPER EXPOSURE.
So here we go: First put your camera in manual mode. Let’s hope it’s daytime. Go to the window and focus on something. Somewhere in the viewfinder you will see the exposure. Let’s say it’s F-5.6 at 1/250 This means that the size of the aperture the ‘scene’ passes through is F-5.6. It reaches the shutter which stays open for 1/250 of a second and is then recorded on the digital sensor or on film. Now as we have learned, shutter speeds and aperture sizes work mathematically . Let’s say that we decide we want to shoot not at F-5.6 but at F-4. Since F-4 is one f-stop larger, it will let in more light than we need. The final print will be too light or overexposed.
Picture it this way; let’s say the aperture is a window. If we make the window larger, more light will enter the room. Let’s say that right behind the window are shutters. If we open the shutters for a longer time, again more light enters the room. Therefore the solution for letting in 1 unit extra light through the window (aperture) is to decrease the time the shutter stays open. So if the correct exposure was F-5.6 at 1/250 and we change to the larger aperture F-4, we must decrease the shutter speed by 1 unit to 1/500. Thus F-5.6 at 1/250=F-4 at 1/500. BOTH COMBINATIONS ALLOW EXACTLY THE SAME QUANTITY OF LIGHT TO BE RECORDED. In this case the main difference between the two shots will be depth of field. The F-5.6 shot will be sharper from foreground to background than the F-4 shot.
ISO works in a similar mathematical fashion. Let us say that it is an hour after sunset and the light is really low. We are using a 50mm lens at ISO 100 and taking a portrait of Bozo the clown on the beach. We look through the viewfinder and find that the exposure is F-2.8 at 1/30th of a second. We know that since Bozo is standing he is moving slightly, and we therefore need to go to 1/60 to ensure that there is no movement which will blur the scene.
What do we do? Basically we need 1 more unit of light to get the shutter speed to 1/60. If we raise the ISO to ISO 200 and keep the same aperture, then the shutter speed becomes 1/60. We would have the identical overall exposure and our subject would be sharp. We could also raise the ISO more if we like. If we raise it to ISO 400 (adding 1 more unit of light) then we can keep the shutter speed at 1/60 and change the aperture to F-4. This would allow us to get more depth of field if we wanted it. Raising the ISO to 800 would allow us to shoot at F-5.6 for even more depth of field, while keeping the shutter speed at 1/60.
Once exposure is fully understood, it’s easy to see how we can manipulate the variables that make up exposure (ISO, shutter-speed, and aperture) to produce very creative images. Until exposure it is fully understood, practice shooting at different apertures (while being mindful of the shutter speed). The depth of field produced by different apertures will be one of the most creative decisions you make for every shot that you take.
Pages: 1 2


