This month, again, we have a very cool assignment on our photography forum.
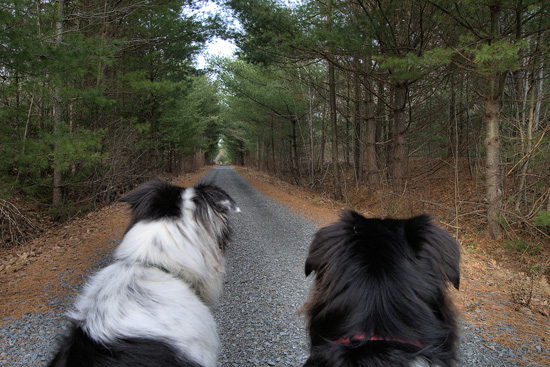
The goal is to shoot a subject from a different point of view. We just started this assignment and already have many cool posts. Here’s one from forum member Bambi that rocks. If you are lurking on our forum — we’re a friendly bunch so feel free to register for free and let’s see your creativity.
Same subject different point of view
29 other things to buy after your first DSLR
I recently did a photography podcast on buying your first DSLR. In that podcast I suggested NOT spending a whack of cash on your first camera body, and saving it for lenses and accessories instead.
Speaking of all those accessories…member masp from our photography forum started this thread listing other items you’ll need to go with that first DSLR if you want to get serious about photography. It’s a big list for sure but it will give newbies in particular a feel for what many advanced shooters consider to be essential gear, accessories and must have gadgets.
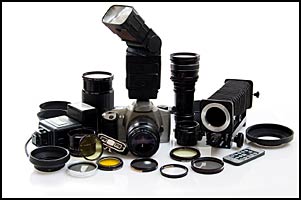
So hat tip to masp once more for this list! Feel free to add your own suggestions in the comments if you feel anything is missing.
Here’s a partial checklist I’ve put together from my own research and listening to the podcast. I’m sure I’ve probably left something important out here or there, so please let me know if you spot any omissions or useful things I should include. Asterisks denote the stuff that is more important or cheap enough to buy first.
A. CAMERA PROTECTION
* 1. UV filter ($10 to 30 to $60?)
* 2. Padded camera case
3. Camera armor?
* 4. LCD screen cover if not included. (Included for Nikons)
* 5. Viewfinder cover and magnifier
6. Fancy camera strap, like the Black Rapid straps?
* 7. Lens hood for any lenses that lack one. (Also keeps stuff from banging into your lens)
B. CLEANING
* 8. Microfiber cloth and a “huff of breath”  (Can’t be more than a few bucks)
9. Air blower. Marko says to buy from a camera store, but Ken Rockwell says a $5 air blower from a drug store may suffice. Any reason to disagree with Rockwell here? (I’m kinda cheap  )
)
* 10. Also consider a blower brush or lenspen. ($5–10)
* 11. Silica gel — it eats moisture in humid conditions (A few bucks)
C. PHOTOGRAPHIC TOOLS
12. Polarizer and ND filters
* 13. Tripod ($50? — $140 + + No reason not to buy used though, I think)
14. Maybe a monopod for portability, but a tripod seems more useful.
15. Flash (consider buying the most expensive one)
* 16. Reflectors maybe, or just a cheap piece of cardboard wearing white clothing.
17. Light meter. Useful for studio work mainly.
D. COMPUTER STUFF
* 18. SD or CF reader. Can you go with a cheap one here? As long as is a high speed one, I *think* it’s okay, but I’d hate to corrupt my data.
19. Photo printer. Pictbridge?
20. A decent monitor that isn’t excessively blue, contrasty or bright (referring to calibration podcast)
21. Monitor and printer color calibration tools.
22. Photography software (I’m going to stick with what’s free for now, but I suppose I’ll eventually buy some software when I figure out what’s most standard)
23. Color calibration equipment ($400-$1400?). Some may be available for $200 or under. Consider buying one before you start doing a lot of editing.
E. MISCELLANY
24. Spare battery ($10 to $30 on Amazon, more for brand name)
25. SD or CF card ($20 to $40 depending on desired size)
26. Extra lens and body caps (losing the originals may lower the resale value of your gear?)
27. Plastic trash bags to cover your gear bag if it’s not waterproofed and it starts raining. White ones may double as reflectors if you don’t mind looking unprofessional.
28. Zip lock bags for holding your cleaning supplies and other stuff maybe.
29. Baseball bat for when some guy on the street tries to grab your camera. J/K J/K I don’t condone violence, except for the Three Stooges variety.
79 — Customizing your camera for free
Photography podcast #79 talks about how to customize your camera using the custom settings functions in your camera’s menu. There are many, many, many useful ways to customize these settings for the way YOU personally shoot, but many photographers don’t use these settings or are afraid to touch these settings. Many features that your camera offers are set to OFF by default, and the only way to access them is by turning their custom function on in the custom menu of your camera. A quick and easy example is high ISO. On my former 30D from Canon, this setting was set to off so my highest normally available ISO was 1600. With one setting change in the custom function menu the highest available ISO becomes 3200.‚ This podcast encourages you to play with similar (and even better) settings in your camera.
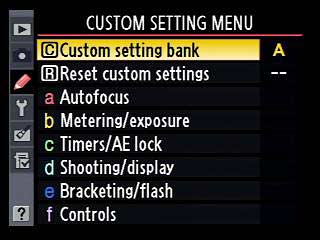
- Nikon D700 customization menu
Links /resources mentioned in this podcast:
The Nikon D700 at B&H
March 2010’s Light and Shadow assignment on the Photography.ca forum
Please join the Photography.ca fan page on Facebook
If you liked this podcast and want to review it on Itunes, this link gets you to the main page
My Facebook profile — Feel free to “friend” me — please just mention Photography.ca
My Twitter page — I will follow you if you follow me — Let’s connect — PLEASE email me and tell me who you are in case I don’t reciprocate because I think you are a spammer.
If you are still lurking on our forum,
feel free to join our friendly ![]() Photography forum
Photography forum
Thanks to Wickeddark, jack label, f8&Bthere, sephibox, Fortytwo and Casil403 who posted a blog comment about our last podcast. Thanks as always to everyone that sent comments by email about our last podcast. Although ALL comments are appreciated, commenting directly in this blog is preferred. Thanks as well to all the new members of the bulletin board.
If you are looking at this material on any other site except Photography.ca — Please hop on over to the Photography.ca blog and podcast and get this and other photography info directly from the source. I Subscribe with iTunes I Subscribe via RSS feed I Subscribe with Google Reader I Subscribe for free to the Photography podcast — Photography.ca and get all the posts/podcasts by Email
You can download this photography podcast directly by clicking the preceding link or listen to it almost immediately with the embedded player below.
Podcast: Play in new window | Download
Photography forum image of the month ‚” Feb. 2010
Every month on our photography forum members nominate images that they like. Then at the end of the month I choose an excellent image and talk about why it rocks. The photo I choose is not necessarily the best one of the month. Ižve come to realize itžs not really logical to pit images from totally different genres against each other. Thatžs why there are categories in photo contests. I just choose a photo that has extremely strong elements that we can learn from.
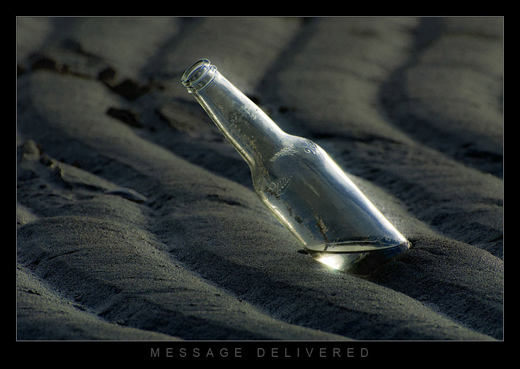
This month’s choice Message delivered is by Michaelaw.
I chose this image for several reasons.
First off look at the great mood Michaelaw has created here. This is no accident; it’s a product of Michael’s attention to the the lighting. This mood helps create the story that ‘makes’ this shot. What IS the story? That’s up to the viewer, it’s helped by the title, but there is a story here. The bottle is without a classic paper message in it, it’s empty save for some water. Who sent it, why? Maybe the beer bottle itself IS the message — “hey I’m on a bender; that’s my message”. Maybe the shot is really about the environment and Man’s lack of concern over it. But there IS a story here, you just have to choose it for yourself.
Compositionally I like this very much. The curved patterned formations in the sand add interest to the shot. The diagonal slant of the bottle with specular edge highlights really give my eye something to cling to. The focus also works very well for me here and I’m digging the background blur. My eye is skillfully guided along the bottle toward the slanted water level collected at the bottom. At bottom of the bottle we see the sun’s reflection and it grabs you.
Exposure is handled very well here with a good range of tones and excellent highlight control.
For all these reasons, this is my choice for image of the month.
Since we all have opinions, some members may disagree with my choice. That’s cool but THIS thread is not the place for debate over my pick, NOR is it the place to further critique the image. The purpose here is to suggest strong elements in the photo that we may learn from.
Congrats again Michaelaw for creating this beautiful image!
I’d also like to include these 2 images as honourable mentions as they also came so so close to being picked.
Behind the mask by Chantelle

![]()
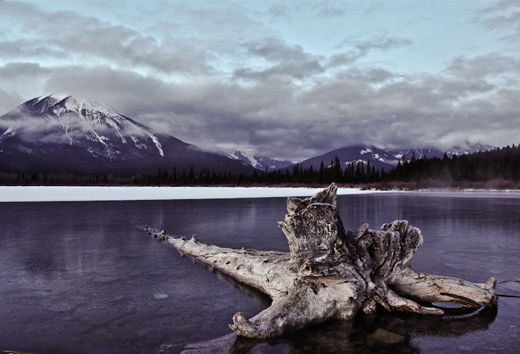
Day 3 — Banff‚ by casil403
Photography forum image of the month – Feb. 2010
Every month on our photography forum members nominate images that they like. Then at the end of the month I choose an excellent image and talk about why it rocks. The photo I choose is not necessarily the best one of the month. I’ve come to realize it’s not really logical to pit images from totally different genres against each other. That’s why there are categories in photo contests. I just choose a photo that has extremely strong elements that we can learn from.
This month’s choice Message delivered is by Michaelaw.
I chose this image for several reasons.
First off look at the great mood Michaelaw has created here. This is no accident; it’s a product of Michael’s attention to the the lighting. This mood helps create the story that ‘makes’ this shot. What IS the story? That’s up to the viewer, it’s helped by the title, but there is a story here. The bottle is without a classic paper message in it, it’s empty save for some water. Who sent it, why? Maybe the beer bottle itself IS the message — “hey I’m on a bender; that’s my message”. Maybe the shot is really about the environment and Man’s lack of concern over it. But there IS a story here, you just have to choose it for yourself.
Compositionally I like this very much. The curved patterned formations in the sand add interest to the shot. The diagonal slant of the bottle with specular edge highlights really give my eye something to cling to. The focus also works very well for me here and I’m digging the background blur. My eye is skillfully guided along the bottle toward the slanted water level collected at the bottom. At bottom of the bottle we see the sun’s reflection and it grabs you.
Exposure is handled very well here with a good range of tones and excellent highlight control.
For all these reasons, this is my choice for image of the month.
Since we all have opinions, some members may disagree with my choice. That’s cool but THIS thread is not the place for debate over my pick, NOR is it the place to further critique the image. The purpose here is to suggest strong elements in the photo that we may learn from.
Congrats again Michaelaw for creating this beautiful image!
I’d also like to include these 2 images as honourable mentions as they also came so so close to being picked.
Behind the mask by Chantelle

![]()
Day 3 — Banff by casil403

Let your skills rock the everyday scene
As admin of a growing photography website I look at a good 20–100 photographs most days of the week. The quality of work that I look at (both on our site and other websites) normally ranges from photography enthusiast to pro.
One of the things that separates amateurs from advanced amateurs/pros is the ability to create the image rather than waiting for something spectacular to happen or finding it through serendipity. Getting to this level involves 3 key things that are 100% attainable with a few months of regular practice.
1 — You need to understand basic exposure.
2 — You need to understand basic composition
3 — You need to understand basic lighting.
A person that practices all 3 of these things can create great shots from otherwise mundane scenes. IF they are waiting for something to happen (like waiting for great outdoor light),‚ they make sure they are waiting at the right time.
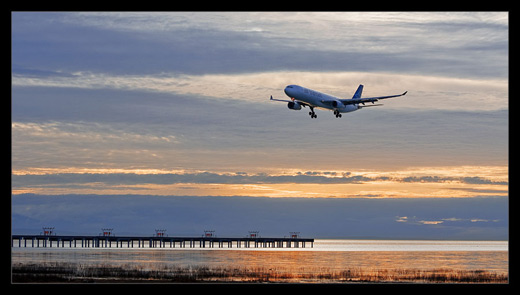
The image above by forum member michaelaw (real name Michael Wollen ) is a great example. How many times have we looked up at the sky to watch a plane land in the distance. Likely many times. It’s a common scene. Some might even call it banal. But take a look at THIS image. It is carefully crafted — NO accidents here.
Look at the beautiful light in the sky. Michael waited for this light. Look at the position of the plane in the sky. Michael waited to freeze the plane in that exact spot. Look at the landing pad at the lower part of the image, look at the foliage and shimmering water in the immediate foreground. They are there on purpose. They are there, because Michael put them there. Because Michael put them there at the right time,‚ in the right place, and exposed the image correctly — This photograph sings and is a pleasure to look at.
Practice the 3 basics listed above and you too will be armed with the skills needed to create great photography from commonplace scenes.
February 2010 forum assignment — Photography and Song Titles
This month we have one of the best assignments we’ve ever had in our photography forum; images that suggest a song’s title. There are already many extremely creative and well done images in this thread. If you are still lurking on the forum but have a creative idea, now would be a great time to join. Click here to register for free.
Here’s 2 images from the thread. First one is by member Bambi — Sunrise, Sunset (Fiddler on the Roof Cast). Second one is mine; Hazy Shade of Winter by Simon and Garfunkel. Who is the cutie in the frame? That’s yours truly taken in the early seventies when the song was still popular.
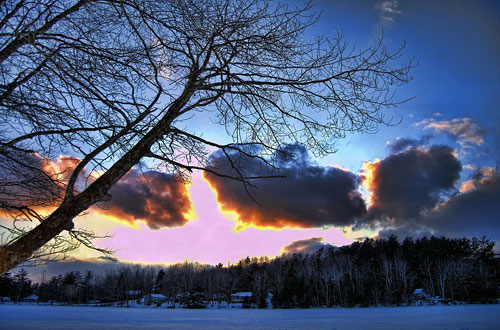
Sunrise Sunset by Bambi (T. Alexander-Arab)
![]()
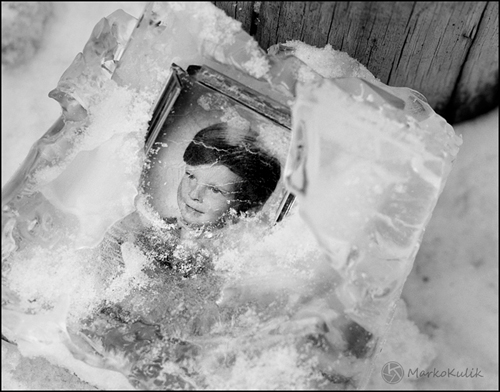
Hazy Shade of Winter by Marko Kulik
Photography forum image of the month — Jan. 2010
Every month on our photography forum members nominate images that they like. Then at the end of the month I choose an excellent image and talk about why it rocks. The photo I choose is not necessarily the best one of the month. I’ve come to realize it’s not really logical to pit images from totally different genres against each other. That’s why there are categories in photo contests. I just choose a photo that has extremely strong elements that we can learn from.
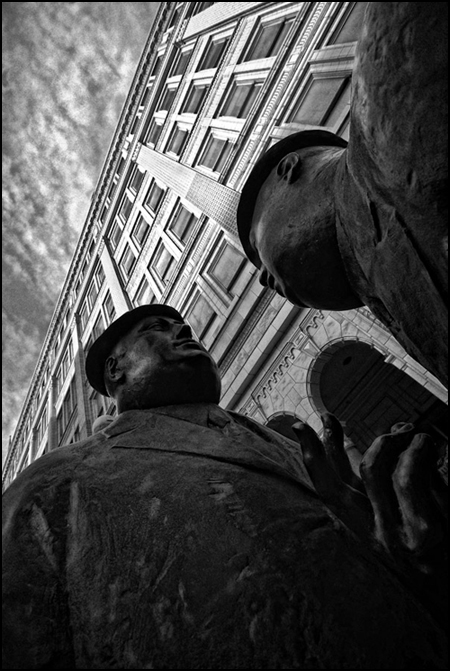
This month’s choice The Conversation is by casil403.
I chose this image for several reasons.
First and foremost, I was drawn in by the unusual angle and point of view of this shot. This angle works very well for me! I love how just above the left statue’s head the office windows are nicely lit. This gives me the feeling of a well-told story, better than the similar story told by the straight on shot seen many, many times. The story is office politics/or work talk etc.
I very much like the lines of the building’s roof and the lines created by the windows. I’m loving this interesting composition. The way that ‘roof-line’ cuts out of the scene to create an isosceles-like triangle at top left (hey I dug geometry) is fan-friggen-tastic. It adds interest to this scene and makes it dynamic.
The sky is beautifully controlled here. It adds flavour to the shot without overwhelming it in any way.
The black and white is very well controlled here and works for me with this subject matter. If I had one teeny nit, I might bring up the highlights in the statues’ faces and hand.
Thousands of people pass these statues every day and scores of tourists are likely snapping away daily… and none of them are likely to lie down on the ground or get on their knees to get this superb angle.
For all these reasons, this is my choice for image of the month.
Since we all have opinions, some members may disagree with my choice. That’s cool but THIS thread is not the place for debate over my pick, NOR is it the place to further critique the image. The purpose here is to suggest strong elements in the photo that we may learn from.
Congrats again casil403 for creating this beautiful image!
Fed Up With Fake Photography ?
Whether an image is “too” photoshopped, or overly retouched is a huge issue for both photographers and non-photographers. We’ve talked about it many times on our forum. It’s an issue for photographers because our medium is in the midst of a dramatic change. Photography has gone digital. Everyone has a digital camera. Every image is fodder for manipulation. Many photographers over-manipulate.
The problem is that there is no consensus on how much manipulation is too much. Some photographers say over manipulation occurs with anything over and above basic editing (contrast and tonal control, cropping and some dodging and burning). Others say we are craftsman and that Photoshop is a tool like any other tool, so there is no limit. (Personally I don’t buy this for a second).
Certainly when you look at a photo, you often cannot tell what level of manipulation was done and nowhere is the level of manipulation revealed. Sometimes though, you can EASILY tell when an image is over-retouched or manipulated.
This is less of a big deal when you are creating a photograph for artistic reasons, but it’s damn serious when young girls want to look like models that don’t exist. The models exist of course but their images are over manipulated to the point of fraud. Impressionable girls want to look like these models hawking beauty-cream. They feel bad/sad when they can’t look like these models. Here is just one recent Newsweek article on this over-manipulation (hat tip to AcadieLibre from our forum). If this trend continues, it won’t be long till we’ll be selling anti-wrinkle cream to ten year olds or freckle remover for red headed babies.‚ All it will take is a couple of‚ before and after photos showing the ‘improvement’ in their appearances. Even babies and ten year olds want to feel ‘better’ about themselves.
But people are catching on, they are getting fed up with this manipulation/fraud/cheating. This week in London England, Conservative party leader David Cameron was blasted for a campaign election poster where he looks 20 years younger than he does. Here’s the original poster, a spoof poster and what Cameron looks like on a normal day.

Over manipulation in photography
So what say you? Are you fed up with fake photography.….….?‚ Or am I just whining because I have no Elvis hair to style?
77 — Neutral density filters — Graduated neutral density filters — Interview with D. Wiggett
Photography podcast #77 features an interview with Darwin Wiggett where we talk about neutral density filters and graduated neutral density filters. Darwin explains why we use these filters and how to use these filters effectively. We discuss hard edge versus soft edge, physical versus software filters, we even talk about reverse graduated neutral density filters. For newbie photographers that have just hatched, Darwin goes over polarizing filters as well.
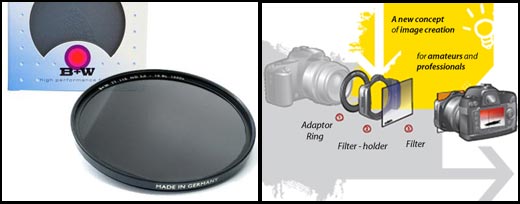
Left — Screw on neutral density filter. Right — The Cokin system
![]()
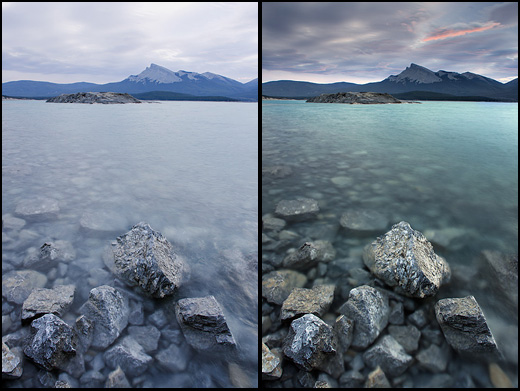
Left — Lake with no filter. Right — Lake with polarizer and-2-stop hard edge grad. Notice how much ‘poppier’ this shot is. The grad reduces the sky’s intensity. The polarizer adds contrast to the clouds in the sky and intensifies its colour. It also removes the water’s reflections thus saturating its colours. ‚© Darwin Wiggett
![]()
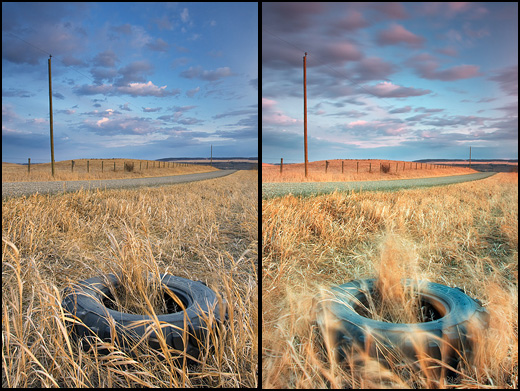
Left — Tire with Polarizer and-2-stop-hard-grad. Right — Tire with a Polarizing filter plus a 2-stop-hard-edge grad and-a 5-stop solid-ND filter. Note the movement of the foreground brush and the softness in the clouds. This was achieved by using the solid ND filter to get a slow shutter speed. ‚© Darwin Wiggett.
![]()
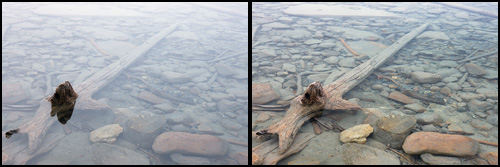
The effect of a polarizer on its own. Left — No polarizing filter. Right — The polarizing filter lets you see through the water by eliminating the water’s reflectivity. With the reflections removed, the colour is much more saturated. ‚© Darwin Wiggett
Links /resources mentioned in this podcast:
Seven Rules for Effectively Using a Polarizer
Filters, holders and vignetting: building a filter system that works with your lenses
The Terrific Triple Threat
Fields of Gold (or was that blue?) Three Camera Filters all Digital Photographers Should be Using
Filters for Outdoor Photography
January’s macro or close-up assignment on the Photography.ca forum
Cokin filters at B&H (Disclosure — Aff links — help support our site)
Singh-Ray filters at B&H
Lee filters at B&H
Please join the Photography.ca fan page on Facebook
My Facebook profile — Feel free to “friend” me — please just mention Photography.ca
My Twitter page — I will follow you if you follow me — Let’s connect — PLEASE email me and tell me who you are in case I don’t reciprocate because I think you are a spammer.
If you are still lurking on our forum,
feel free to join our friendly ![]() Photography forum
Photography forum
Thanks to jacklabel, AcadieLibre and Mars observer who posted a blog comment about our last podcast. Thanks as always to everyone that sent comments by email about our last podcast. Although ALL comments are appreciated, commenting directly in this blog is preferred. Thanks as well to all the new members of the bulletin board.
If you are looking at this material on any other site except Photography.ca — Please hop on over to the Photography.ca blog and podcast and get this and other photography info directly from the source. I Subscribe with iTunes I Subscribe via RSS feed I Subscribe with Google Reader I Subscribe for free to the Photography podcast — Photography.ca and get all the posts/podcasts by Email
You can download this photography podcast directly by clicking the preceding link or listen to it almost immediately with the embedded player below.
Podcast: Play in new window | Download
74 — Hyperfocal distance — How to use the hyperfocal distance
Photography podcast #74 is all about the hyperfocal distance and how to use it in landscape photography. In a nutshell, hyperfocal distance is the distance you focus at to get greater depth of field when focusing on an object in the distance. In this podcast we define what hyperfocal distance is and how to use it for both traditional (film) photography and in digital photography with new DSLRs and lenses.‚ We also talk about when not to use the hyperfocal distance in landscape photography.

Hyperfocal distance chart from dofmaster.com — used by permission; thanks Don Fleming!‚ This beautiful application from the dofmaster.com site clearly shows that by focusing at the hyperfocal distance you gain over 4 feet of sharpness toward the foreground when you use a 5omm lens at F-16 and focus at 27.1 feet instead of‚ where the object actually is at 50 feet.. Try this test for yourself; shoot 1 shot the regular way and 1 shot using the hyperfocal distance. This application already lists the most common digital cameras and takes their crop factors into account.
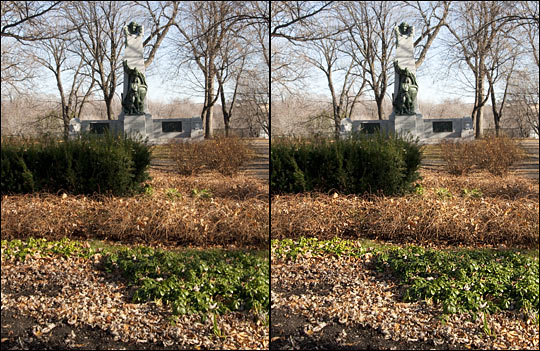
Left image shot normally while right image was shot at the hyperfocal distance. Even at this small size you can see that the right shot shows a bit more sharpness in the midground while the background looks similar in both shots. The effects are more noticeable when you print at larger sizes.
Links /resources mentioned in this podcast:
Dofmaster’s awesome depth of field calculator that also calculates hyperfocal distance
Dofmaster’s depth of field calculator for free use with an iphone (need to connect to the Net — use this URL from an IPhone ONLY — NOT from your computer)
Dofmaster’s simulated depth of field calculator for free use with an Non-iphones (need to connect to the Net)
Dofmaster’s Itunes depth of field calculator App for $1.99 (No Internet connection required)
November’s ‘landscapes in portrait orientation’‚assignment on the Photography.ca forum
Please join the Photography.ca fan page on Facebook
My Facebook profile — Feel free to “friend” me — please just mention Photography.ca
My Twitter page — I will follow you if you follow me — Let’s connect — PLEASE email me and tell me who you are in case I don’t reciprocate because I think you are a spammer.
If you are still lurking on our forum,
feel free to join our friendly ![]() Photography forum
Photography forum
Thanks to Kat, Glenn Euloth (Iguanasan), Bambi and Alex Maxim who posted a blog comment about our last podcast. Thanks as always to everyone that sent comments by email about our last podcast. Although ALL comments are appreciated, commenting directly in this blog is preferred. Thanks as well to all the new members of the bulletin board.
If you are looking at this material on any other site except Photography.ca — Please hop on over to the Photography.ca blog and podcast and get this and other photography info directly from the source. I Subscribe with iTunes I Subscribe via RSS feed I Subscribe with Google Reader I Subscribe for free to the Photography podcast — Photography.ca and get all the posts/podcasts by Email
You can download this photography podcast directly by clicking the preceding link or listen to it almost immediately with the embedded player below.
Podcast: Play in new window | Download
