Removing Backgrounds from Images

So you’ve just taken the per­fect shot of a pair of shoes for a client. But wait… ooops. The client didn’t want the shoes to be on the table. So what can be done to remove the table? There are a few ways to go about it. First (and most obvi­ous) is to shoot the pair of shoes on a sim­ple back­drop with no distractions.


But if this is not pos­si­ble, Pho­to­shop can help you achieve that ‘near per­fect’ shoe shot by extract­ing it from the back­ground. Photoshop’s selec­tion tools work well to get the job done. The quick selec­tion tool is great for sim­ple extrac­tions. The back­ground eraser is another great tool. Although many peo­ple loved the extract tool in Pho­to­shop CS3, it’s miss­ing from CS4. (If you loved it and still have CS3, you can copy it from the CS3 Plug-ins-Filters folder to CS4).‚ But depend­ing on the sub­ject, these tools may miss out on some of the finer details like a model with frizzy hair. In cases like these, man­u­ally trac­ing the edges with the pen tool and then con­vert­ing it to a selec­tion is ideal. Tedious yes, but it will give you opti­mal results.

Plug­gins are also avail­able for remov­ing back­grounds if you’re up for the expense.
Who knew shoes could be so tech­ni­cal?!
Link from our Pho­tog­ra­phy forum

Removing Backgrounds from Images

So you’ve just taken the per­fect shot of a pair of shoes for a client. But wait… ooops. The client didn’t want the shoes to be on the table. So what can be done to remove the table? There are a few ways to go about it. First (and most obvi­ous) is to shoot the pair of shoes on a sim­ple back­drop with no distractions.


But if this is not pos­si­ble, Pho­to­shop can help you achieve that ‘near per­fect’ shoe shot by extract­ing it from the back­ground. Photoshop’s selec­tion tools work well to get the job done. The quick selec­tion tool is great for sim­ple extrac­tions. The back­ground eraser is another great tool. Although many peo­ple loved the extract tool in Pho­to­shop CS3, it’s miss­ing from CS4. (If you loved it and still have CS3, you can copy it from the CS3 Plug-ins-Filters folder to CS4).  But depend­ing on the sub­ject, these tools may miss out on some of the finer details like a model with frizzy hair. In cases like these, man­u­ally trac­ing the edges with the pen tool and then con­vert­ing it to a selec­tion is ideal. Tedious yes, but it will give you opti­mal results.

Plug­gins are also avail­able for remov­ing back­grounds if you’re up for the expense.
Who knew shoes could be so tech­ni­cal?!
Link from our Pho­tog­ra­phy forum

Composition in Photography

We all hear of cer­tain rules in pho­tog­ra­phy that one may want to abide by. It is not to say these rules are set in stone but if fol­lowed, nor­mally your pho­tos stand out that much more.


The ‘Rule of Thirds’ is used reg­u­larly by most advanced pho­tog­ra­phers. The rule states that an image should be imag­ined as divided into nine equal parts (like a tick tack toe board) by two equally-spaced hor­i­zon­tal lines and two equally-spaced ver­ti­cal lines, and that impor­tant com­po­si­tional ele­ments should be placed along these lines or their inter­sec­tions. The shot above is a good exam­ple. Most new­bies would have placed the model dead cen­ter in this image. The image works much bet­ter com­po­si­tion­al­ly  with the model to to right of cen­ter on one of the lines with the yel­low dot. Play with this ‘rule’ for your­self just to test it out.

Depth of Field (oth­er­wise known as DOF), is the area from the fore­ground to the back­ground within your photo that is in focus. A nar­row DOF (F-2.0 or F-2.8 for exam­ple) will allow the main sub­ject of your photo in be in focus while the back­ground is blurred. A wider DOF allows one’s eyes to wan­der over the whole image as there are more details that are in focus.

Other ‘rules’ to con­sider include lead­ing lines, fram­ing, fore­ground inter­est and more.

Orig­i­nal link from our Pho­tog­ra­phy forum

Composition in Photography

We all hear of cer­tain rules in pho­tog­ra­phy that one may want to abide by. It is not to say these rules are set in stone but if fol­lowed, nor­mally your pho­tos stand out that much more.


The ‘Rule of Thirds’ is used reg­u­larly by most advanced pho­tog­ra­phers. The rule states that an image should be imag­ined as divided into nine equal parts (like a tick tack toe board) by two equally-spaced hor­i­zon­tal lines and two equally-spaced ver­ti­cal lines, and that impor­tant com­po­si­tional ele­ments should be placed along these lines or their inter­sec­tions. The shot above is a good exam­ple. Most new­bies would have placed the model dead cen­ter in this image. The image works much bet­ter com­po­si­tion­ally‚ with the model to to right of cen­ter on one of the lines with the yel­low dot. Play with this ‘rule’ for your­self just to test it out.

Depth of Field (oth­er­wise known as DOF), is the area from the fore­ground to the back­ground within your photo that is in focus. A nar­row DOF (F-2.0 or F-2.8 for exam­ple) will allow the main sub­ject of your photo in be in focus while the back­ground is blurred. A wider DOF allows one’s eyes to wan­der over the whole image as there are more details that are in focus.

Other ‘rules’ to con­sider include lead­ing lines, fram­ing, fore­ground inter­est and more.

Orig­i­nal link from our Pho­tog­ra­phy forum

How to Create Sepia Tones

To add a cer­tain nos­tal­gic effect to pho­tos, many fine art pho­tog­ra­phers‚ enjoy chang­ing the colour of the pho­to­graph or actu­ally ton­ing the print to sepia. Using the dark­room to achieve your sepia effect is an option if you have the facil­i­ties avail­able. If not, you have two other options — an in cam­era option on many DSLRs and good old photoshop.

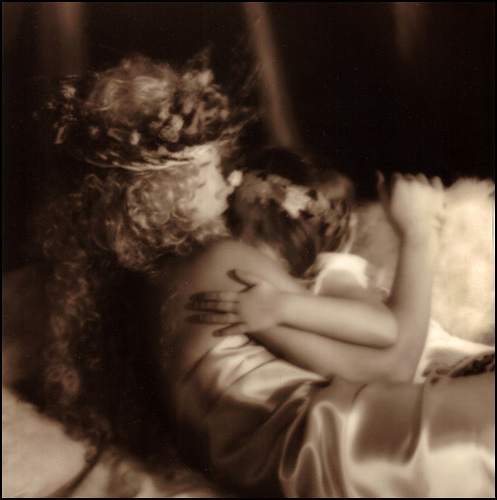
This image was printed in the darkroom and then toned in a sepia bath to get this rich brown colour.

Venus and Cupid by Marko Kulik — This image was printed in the dark­room and then toned in a sepia bath to get this rich brown colour.


Many dig­i­tal cam­eras now offer you the option of tak­ing the image in sepia (and other tones as well like blue, red, green etc.) This is quick and effi­cient for imme­di­ate results. It does have it’s lim­i­ta­tions though, like los­ing all of the colour infor­ma­tion in the image. This is why most pho­tog­ra­phers like to ‘play around’ with their photo in photoshop.

Pho­to­shop not only allows the option of con­vert­ing to sepia, but it fur­ther allows a whole range of brown/orange tones to choose from. Some artists pre­fer a more muted sepia, while oth­ers pre­fer it to appear more dras­tic. Either way, there is really a vast array of tones to choose from.

What­ever the method, just make sure of one thing — save an orig­i­nal copy of your photo just in case you decide that sepia wasn’t for you after all.

Here’s the link from our Pho­tog­ra­phy forum

66 — Becoming a Photography Assistant

Pho­tog­ra­phy pod­cast #66 dis­cusses how to become a photographer’s assis­tant and this topic was sug­gested by new bul­letin board mem­ber Ray. Thanks Ray!‚ Becom­ing a pho­tog­ra­phy assis­tant is a great way to learn how pho­tog­ra­phy is done in the ‘real world’ with real world pres­sures. It is a great way to decide if being a pro­fes­sional pho­tog­ra­pher is really what you want to do. This pod­cast sug­gests some good ways to get your foot in the door. If vis­i­tors read­ing this have addi­tional ideas, leav­ing a com­ment would be most appreciated.

Links men­tioned in this pod­cast:
May’s Nos­tal­gia assign­ment on the Photography.ca forum
See and vote on April 2009’s mem­ber images
Pho­tog­ra­phy jobs (dif­fer­ent USA list­ings — some for pho­tog­ra­phy assistants)

If you are still lurk­ing on our forum,
feel free to join our friendly :) Pho­tog­ra­phy forum

Thanks as always to every­one that sent com­ments by email about our last pod­cast. Although ALL com­ments are appre­ci­ated, com­ment­ing directly in this blog is pre­ferred. Thanks as well to all the new mem­bers of the bul­letin board.

If you are look­ing at this mate­r­ial on any other site except Photography.ca — Please hop on over to the Photography.ca blog and pod­cast and get this and other pho­tog­ra­phy info directly from the source. I Sub­scribe with iTunes I Sub­scribe via RSS feed I Sub­scribe with Google Reader I Sub­scribe for free to the Pho­tog­ra­phy pod­cast — Photography.ca and get all the posts/podcasts by Email
You can down­load this pho­tog­ra­phy pod­cast directly by click­ing the pre­ced­ing link or lis­ten to it almost imme­di­ately with the embed­ded player below.

Cameras and Manual Mode

Using Man­ual Mode on your cam­era… daunt­ing to most new­bie pho­tog­ra­phers, but a gem once you know how to use it.

Many new­bie pho­tog­ra­phers steer clear away from Man­ual mode, and Opt for Auto­matic mode instead.‚ Full ‘Auto’ mode chooses every­thing from your ISO, to your shut­ter speed and aper­ture includ­ing whether or not a flash should be used. So really, it gives you a safety net to assure you can grab that shot with­out muff­ing it up. That said, the shot you end up with is based on the CAMERA’s choices not the photographer’s choices.


Man­ual mode how­ever allows you to set both your aper­ture and shut­ter speed sep­a­rately, with­out the cam­era auto­mat­i­cally chang­ing the other to suit. With this in mind, you can be more cre­ative with your shots, and in turn, you can bet­ter under­stand how to get that per­fect shot.

Man­ual mode seems to take more time then, right? Right.

But as a result, it forces you to THINK about your sub­ject at hand, learn about light, shut­ter speed, depth of field and work at per­fect­ing your shot and your craft.

PHOTOGRAPHY FORUM LINK

Shooting good portraits

The per­fect por­trait doesn’t exist because there is always some­one that won’t like it ;)
That said, there are a few basic tips that can help you get more inter­est­ing and more flat­ter­ing portraits.


~ Watch which way your light­ing is com­ing in and check the qual­ity of the light. Softer dif­fused light is a much bet­ter light for flat­ter­ing por­traits than harsh direct light. Although back­light is amaz­ing for dra­matic inter­est­ing por­traits, it’s harder to work with espe­cially for some­one newer to pho­tog­ra­phy. Using front light, side­light, and 3/4 light along with fill light from a sec­ondary flash‚ or reflec­tor will bring your por­trait skills up a notch.
~ Adjust your aper­ture so that the back­ground blurs out a bit and more focus is placed on your sub­ject.
~ Alter your per­spec­tive by tak­ing the shot from a dif­fer­ent angle rather than eye level. This can really change the ‘wow’ fac­tor of your photo.
~‚ Play with eye con­tact — it does won­ders to a pho­to­graph when your subject’s focus is on some­thing else.

Shoot­ing the per­fect por­trait may seem daunt­ing, but keep­ing use­ful tips in mind when doing so will make por­trait pho­tog­ra­phy a ‘snap’.

More tips can be found at: http://www.photography.ca/Forums/showthread.php?t=2393

65 — Color casts — correcting color casts — Interview with Dominic Fuizzotto

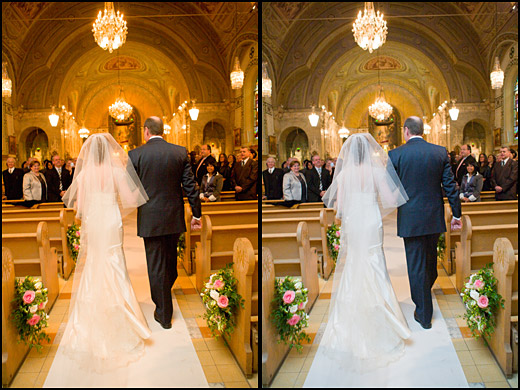
Pho­tog­ra­phy pod­cast #65 fea­tures an inter­view with Mon­treal Wed­ding pho­tog­ra­pher Dominic Fuiz­zotto. In the inter­view we talk about why colour casts hap­pen and how to cor­rect colour casts.‚ When images have a colour cast they usu­ally just don’t look right and it is our job as pho­tog­ra­phers to get rid of bad colour casts.

The image at left has a strong yellow/orange cast. We easily see the cast in the brides dress which is white. The cast is removed in the photo on the right and the brides dress is now white. Image by Dominic Fuizzotto

The image at left has a strong yellow/orange cast. We see the cast in the bride’s dress which is NOT white. The cast is removed in the photo on the right and the bride’s dress is now white. Thanks to Dominic Fuiz­zotto for these examples.

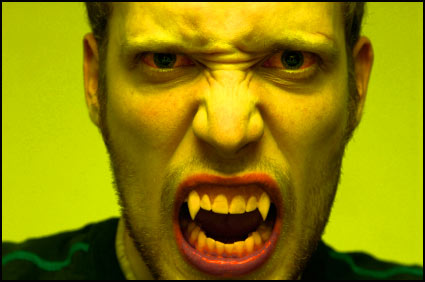
One IMPORTANT thing that I for­got to men­tion in the pod­cast is that on the rare occa­sion you may actu­ally WANT to intro­duce a colour cast into an image as in the photo below. This can be done eas­ily in Pho­to­shop but it can also be done by using gels on lights or by set­ting your camera’s white bal­ance to the wrong set­ting on purpose.

This image has a delib­er­ate green/yellow cast. Most times you don’t want this but some­times like in this shot, it works and adds to the shot.

The colour wheel in photography

The colour wheel in photography


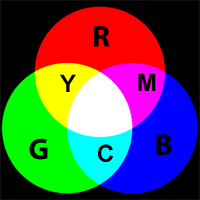
This is the colour wheel that most pho­tog­ra­phers use whether they know it or not.‚ White light is made of red, green and blue light. The com­pli­men­tary or oppo­site colours of red, green and blue are cyan, magenta and yel­low respec­tively. In order to reduce a colour cast, we need to intro­duce its oppo­site into the image.‚ There­fore, if an image has a blue cast we reduce that cast by adding yel­low into the image.

Links men­tioned in this pod­cast:
Dominic Fuiz­zotto Pho­tog­ra­phy
April’s por­trait assign­ment on the Photography.ca forum

If you are still lurk­ing on our forum,
feel free to join our friendly :) Pho­tog­ra­phy forum

Thanks as always to every­one that sent com­ments by email about our last pod­cast. Although ALL com­ments are appre­ci­ated, com­ment­ing directly in this blog is pre­ferred. Thanks as well to all the new mem­bers of the bul­letin board.

If you are look­ing at this mate­r­ial on any other site except Photography.ca — Please hop on over to the Photography.ca blog and pod­cast and get this and other pho­tog­ra­phy info directly from the source. I Sub­scribe with iTunes I Sub­scribe via RSS feed I Sub­scribe with Google Reader I Sub­scribe for free to the Pho­tog­ra­phy pod­cast — Photography.ca and get all the posts/podcasts by Email
You can down­load this pho­tog­ra­phy pod­cast directly by click­ing the pre­ced­ing link or lis­ten to it almost imme­di­ately with the embed­ded player below.

Thoughts on Borders

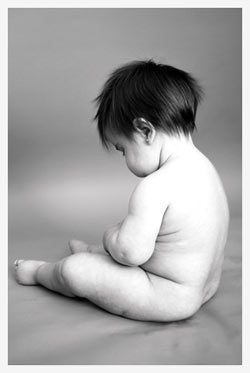
When we print out pho­tographs or pur­chase pieces of art on can­vas, we gen­er­ally get these art pieces framed to ‘fin­ish’ the look. Well how about pho­tographs posted online? Many peo­ple are now post­ing their pho­tographs online with a bor­der to com­ple­ment the piece. But does it really complement?


Some might feel that bor­ders are dis­tract­ing to the visual ele­ments in the photo. A bor­der can fur­ther destroy a photo if it’s too over­whelm­ing to the sub­ject at hand.

Oth­ers can’t do with­out the bor­ders; they serve to help make the photo ‘pop’, make the photo a tad more ele­gant, or depend­ing on the color and con­text of the photo, can also com­ple­ment the ele­ments in the photograph.

Just as every pho­tog­ra­pher has their own tastes in their photo sub­jects, they also have their own opin­ions on bor­ders as a cre­ative ele­ment. Essen­tially, it’s all up to the artist and how they feel their cre­ativ­ity should be displayed.

PHOTO FORUM LINK: http://www.photography.ca/Forums/showthread.php?t=3049

A Mad Moment — Life in Your Hands — Mad Aussie

As pho­tog­ra­phers we often find our­selves in all man­ner of sit­u­a­tions, and some­times, our moral­ity can be tested. Do we take the pic­ture of the lit­tle girl because we think she is a lit­tle cutie? Should we take a photo of that auto acci­dent? Take the photo, or let the lit­tle crea­ture die? These are just a few examples.


Just what bound­aries lie out there for us? Where and how do we find those bound­aries and lim­its within our­selves? What sub­jects and ele­ments are off lim­its to you per­son­ally when you have your cam­era in your hot, lit­tle hands?

Recently in our forums I posed a cou­ple of ques­tions to explore this line of thought. You can see those threads by click­ing the links below. I think you might find the dis­cus­sions inter­est­ing AND, I hope, you’ll even con­sider join­ing the forum your­self and telling us your thoughts as well.

Forum Threads

Life in Your Hands

Off Lim­its

By Mad Aussie — Photography.ca blog con­trib­u­tor & forum mem­ber
www.astrovisual.com.au
www.astrovisualphotography.com.au
www.istockimages.com.au

DPI & PPI

A les­son in Pho­tog­ra­phy often over­looks the famous acronyms of DPI and PPI. Two things that often con­fuse the heck out of peo­ple. Why is it that some images show on your com­puter at 72 DPI when you set your cam­era to the high­est res­o­lu­tion? And How does DPI dif­fer from PPI, I mean, can one let­ter in the acronym really make all that dif­fer­ent? YES. Let’s gan­der at the answer to these ques­tions, shall we?


Let’s start with PPI. Pix­els per Inch. This will affect the print size of your photo and will in turn affect the qual­ity of the out­put. If there are too few pix­els per inch, then the pix­els will be very large and you will get a very pix­i­lated image, thus affect­ing the qual­ity of the out­put. There are 2 ways that you can change the print size, by resam­pling or by not resam­pling. Not resam­pling is what you gen­er­ally want to do; this will only change the size of the print out. Using resam­pling will actu­ally change the num­ber of pix­els (and thus the file size) in order to match the print size.

DPI on the other hand refers only to the printer — Dots per Inch. Every pixel out­put is made up of dif­fer­ent col­ors of ink (gen­er­ally 4 or 6 col­ors — depend­ing on your printer). Due to the small amount of col­ors avail­able, the printer needs to be able to mix these inks to make up all the col­ors of the image. So each pixel of the image is cre­ated by a series of tiny dots. A high DPI printer has more dots mak­ing up each pixel, and thus a higher and bet­ter qual­ity image out­put. Vice versa for a lower qual­ity DPI printer.

Peo­ple often use the terms of DPI and PPI as one com­mon one, which is really not the case. They are both dif­fer­ent, and thus should be used as so.

PHOTOGRAPHY FORUM LINK: http://www.photography.ca/Forums/showthread.php?p=11200