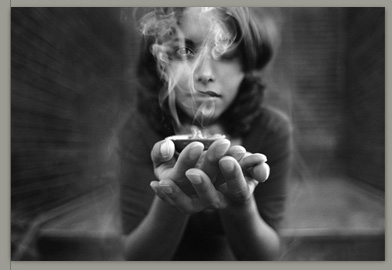
Interview with Dita Kubin — Photography podcast #7


Soma by Dita Kubin

This show fea­tures a recent tele­phone inter­view with Mon­treal fine art pho­tog­ra­pher Dita Kubin. We talk about what moti­vates her work, her cre­ative process and even a bit about her camera/computer/printing technique.

And just like that. Bang. We’re already at the end of Decem­ber — it goes so fast.
Happy hol­i­days to every­one that lis­tens and that has sub­scribed.
More inter­view pod­casts with fine art pho­tog­ra­phers will be fea­tured in 2007 along with reviews and ‘how to’ pod­casts as well.

Happy hol­i­days every­one! Only the best for 2007!!!

Pho­tog­ra­phy pod­cast tran­script #7

So many amazing photographers

I’ve recently come into con­tact with a few AMAZING fine art pho­tog­ra­phers. They have great sto­ries and great pho­tographs. A cou­ple of them have even agreed to do inter­views with me for future pod­casts and you’ll be see­ing their work and lis­ten­ing to them shortly. Stay tuned!

Shooting through glass — results

Here are the results from my exper­i­men­ta­tion with shoot­ing through glass. Basi­cally I went to a glass store and asked to buy scrap pieces of bro­ken glass. I was espe­cially look­ing for glass that had a bit of tex­ture in it. I looked through the glass with my eye and chose pieces that had just a bit of pat­tern and/or tex­ture. I bought about‚6 pieces of scrap glass for around 5 dol­lars. The pieces of glass that I bought were a bit too small in ret­ro­spect. I’d rec­om­mend the min­i­mum size to be 6 x‚8 inches (15.2 X 20.4 cm)

To shoot I put the cam­era on a tri­pod and placed dif­fer­ent pieces of glass between the lens and the fake flow­ers. Seems to me that the best shots were those where I placed the glass closer to the flow­ers than closer to the lens. I man­u­ally held the‚glass dur­ing the expo­sure, and I did this with­out using a cable release (which would have been handy). On some shots I focused on the flow­ers through the glass, and on other shots I just focused on the glass. The effects are quite painterly and I encour­age exper­i­men­ta­tion. Here are the results.

normal shot
Nor­mal shot

shooting through glass 1
Through tex­tured glass

shooting through glass 2
Through tex­tured glass

Photographing through glass
Through tex­tured glass

photographing through glass
Shot through amber glass with texture


Pieces of the actual glass that were used

Camera and grey card exposure example

This is a good exam­ple of the expo­sure we talked about in pod­cast #6. In the first image, I took a shot of the scene using only the camera’s meter and no adjust­ments. As we dis­cussed in the pod­cast the job of all cam­era meters is to aver­age out the scene. Since so much light was com­ing in via the win­dow, the cam­era ‘said’ hey I need to reduce expo­sure. There­fore the cat has almost no detail, but the cur­tains look great.

In shot two I based my expo­sure on the grey card by approach­ing it, fill­ing the cam­era frame with it, plug­ging the read­ing into the cam­era and tak­ing the shot with that read­ing. Notice how the cur­tains have almost no detail now. This is a much bet­ter expo­sure if the goal of the shot‚in to show a cat in the light by the win­dow. The expo­sure should have also been very sim­i­lar had we used an inci­dent meter read­ing based on the cat.

As a final note both these shots illus­trate another point from the pod­cast which is that if the con­trast (the dif­fer­ence between the bright­est and dark­est ele­ments) of the scene is too great, the cam­era will NOT be able to record both ends properly.

Photography transcript 6 — Exposure in photography — Photography.ca

[Cam­era clicks]

Please note that this is an audio tran­scrip­tion. Gram­mer and punc­tu­a­tion will not be per­fect.Hi there every­one and wel­come to the Pho­tog­ra­phy Pod­cast on Photography.ca.‚ My name Marko and we are com­ing to you from Mon­real, Que­bec, Canada, and today is Decem­ber 8, 2006.
For today’s show, we are going to talk about expo­sure.‚ Although a lot of peo­ple know about expo­sure, a lot of peo­ple do not.‚ Some­one on the bul­letin board men­tioned that they like to know a lit­tle bit more about get­ting good expo­sure, so I thought I talk about that today.‚ Even if you know about it, I guess you can hear about it again and we all learn from each other’s tech­niques.‚ It is a good thing to do.
Expo­sure refers to the quan­tity of light hit­ting the film or dig­i­tal sen­sor, in terms of a dig­i­tal cam­era, to cor­rectly take the shot.‚ This quan­tity of light, it needs to be pre­cise.‚ If too much light hits the film or sen­sor, the shot will be over­ex­posed or too light.‚ If not enough light hits the dig­i­tal sen­sor or film, then the shot will be too dark and it will be under exposed.‚ It really needs some pre­ci­sion.‚ The good news is, is that in today’s mod­ern cam­eras either tra­di­tional cam­eras or dig­i­tal cam­eras, the sen­sor in that cam­era is very sophis­ti­cated.‚ Gen­er­ally, that sen­sor will give you good results most of the time.‚ Under nor­mal cir­cum­stances when there is good mix­ture of tones in the scene, your shot will be cor­rectly exposed because basi­cally what the cam­era sen­sor is try­ing to do, it is try­ing to give an aver­age read­ing of all the tones in the scene.‚ If you have a lot of dark tones and a lot of light tones and some mixed tones, well, then your cam­era will gen­er­ally give you very good expo­sure and that is all you need to do.‚ The prob­lems hap­pen when there is too much of one tone or too much of another tone.‚ Specif­i­cally, if there is too many light tones or too many dark tones, what the cam­era is going to try and do and say, “Hey look at those light tones com­ing to the cam­era.‚ In order for me to make this aver­age, I need to close down a bit.”‚ What is going to hap­pen is your shot is going to look grayer or not as light as it should.‚ These are sit­u­a­tions where you need to be care­ful.‚ There are other tech­niques that you can use that will help solve these sit­u­a­tions.
The clas­sic exam­ple, of course, is some­one stand­ing in front of beach or in front of a win­dow and then another per­son tries to take a pho­to­graph of that.‚ When that cam­era is look­ing at the scene, it is say­ing, “Oh my good­ness, look at all the light com­ing into the cam­era.‚ Again, I need to shut down.”‚ What hap­pens is the per­son in front of the beach or the win­dow ends up look­ing too dark because the cam­era under­ex­posed the sub­ject because so much light was com­ing into the cam­era.‚ These are the sit­u­a­tions where you have to be care­ful.‚ When you see extreme amounts of light com­ing into the cam­era or on the oppo­site end, if you are tak­ing a pic­ture of, let us say, some­one wear­ing dark clothes against the dark wall, the cam­era is going to say, “Oh my god, this scene is so dark.‚ I need to aver­age it out.‚ I need to open up a lot.‚ I need to give the shot more expo­sure.”‚ What hap­pens is the black per­son in the black suit against the black wall ends up turn­ing out mushy and not black because the cam­era did not cor­rectly expose for those tones.‚ Like I said, again, to recap, in nor­mal scenes where there is a vari­ety of tones, there is really no prob­lem and you will gen­er­ally get good expo­sure.‚ The trick is being able to notice when the scene is not nor­mal.‚ That only comes with expe­ri­ence.‚ Of course, if you have a dig­i­tal cam­era, you could just look at the results and adjust expose accord­ingly and hope­fully learn from it or if you are with a con­ven­tional cam­era, take notes if you are learn­ing and then when you get back the results you can also see what went right and what went wrong.
Now, the cam­era sen­sor in your cam­era, that is a reflec­tive sen­sor.‚ That is reflec­tive meter.‚ It is called reflec­tive meter because it mea­sures the light that is hit­ting your sub­ject and com­ing back to the cam­era, the light that is being reflected back to the cam­era.‚ These are gen­er­ally excel­lent in qual­ity as we men­tioned before espe­cially in mod­ern cam­eras.‚ Again, you just have to be aware of the sit­u­a­tion where the light­ing is not nor­mal because that cam­era meter will be fooled.‚ What these reflec­tive meters do when they are in cam­era is they aver­age out the whole scene within the cam­era.‚ It looks at the whole scene and the cam­era mea­sures the whole scene.
There is another type of reflec­tive meter called the spot meter.‚ It is exactly the same in prin­ci­ple except that it only mea­sures a smaller area of the pho­to­graph.‚ Usu­ally, you will see like a cir­cle in the mid­dle of the cam­era when you are look­ing through it. ‚In the cen­ter of that cir­cle, there will be smaller cir­cle or a smaller square.‚ If you have spot meter­ing avail­able on the cam­era, it will mea­sure exactly what is in that teeny spot.‚ It is really handy when you are more advanced and you want your expo­sure to be based on a par­tic­u­lar area of the shot, but for most peo­ple the type of meter­ing that is non-spot that eval­u­ates the whole scene or the whole frame of what you are shoot­ing gives really good results.
A great tool that can help with expo­sure, espe­cially if you are just learn­ing or you want to per­fect your meter­ing tech­nique or you want to assure your­self of good results, is a gray card.‚ What the gray card does is the gray card is the exact mea­sure­ment that the cam­era is try­ing to achieve.‚ The cam­era is try­ing to make all the tones mid­dle gray.‚ Although this may sound weird for color pho­tog­ra­phy, again, it is try­ing to achieve a mid­dle color so that the expo­sure will always be aver­age and thereby cor­rect.‚ You can buy this gray card at any photo store and it is a great, great handy tool when you are learn­ing.‚ If you do come across a sit­u­a­tion where you are just not quite sure of expo­sure, espe­cially if you are with a non-digital cam­era and you can­not see result right away, what you could do is, let us say you are tak­ing a pic­ture an object or a per­son, well, you have that per­son hold the gray card or you use some type of device to hold the gray card in place and you approach the sub­ject and you take the meter read­ing off the gray card.‚ You approach the gray card and you have the gray card fill the frame of the cam­era.‚ You note the expo­sure on the cam­era and you plug that expo­sure in when you back up.‚ That will give you a very accu­rate result.‚ You should also be aware that the actual expo­sure is depen­dent on three vari­ables, which is the film speed, the aper­ture, and the shut­ter speed.‚ These three vari­ables, they change.‚ They are not con­stant.‚ Although you may use cer­tain a film or your cam­era may tell you that it is using a cer­tain film sen­si­tiv­ity, it is not always bang on.‚ As you approach in expe­ri­ence or as you approach bet­ter pho­to­graphic tech­nique, you may want to make smaller adjust­ments in order to achieve bet­ter results.‚ In using the gray card, you could really find out the dif­fer­ence between the camera’s expo­sure and what the actual neu­tral expo­sure really is.‚ I rec­om­mend using the gray card when you get like a new cam­era or a new lens or you want to really per­fect your expo­sure.‚ Just take a shot, put the gray card in the scene, approach the gray card, take the meter read­ing from the gray card and your cam­era, then keep that meter read­ing back up and take the shot as you nor­mally would.‚ A good thing to do as always would be to take the shot accord­ing to what the cam­era read­ing was giv­ing you from your posi­tion as opposed to what it gave you when you approach the gray card in the scene.‚ Again, it is a great, great learn­ing tool and expe­ri­ence.‚ The meter­ing we just talked about, this reflec­tive meter, it comes with the cam­era and it is great tool to use.‚ You can also have an exter­nal spot meter if your cam­era does not have one.‚ They are pretty expen­sive, but they are great tools to have as well.‚ What it does is to kind of looks a lit­tle bit like a gun, let us say, and from your posi­tion you aim it at the sub­ject and you can get an expo­sure read­ing that is very, very pre­cise from a small area on an exter­nal reflec­tive spot meter.‚ Very use­ful device for those that are more advanced who really want to per­fect their expo­sure.
Another type of meter that is very use­ful to have and most pros have one, or even advanced ama­teurs they have one, is called an inci­dent meter.‚ What the inci­dent meter does is it mea­sures the amount of light falling on the sub­ject.‚ It does not have to do with the reflec­tion back to your cam­era.‚ It is the actual amount of light that is falling on your sub­ject.‚ You approach the sub­ject phys­i­cally.‚ It does not mat­ter if it is a per­son or an object, but it is def­i­nitely some­thing that you can approach.‚ You would not use it for a moun­tain or a land­scape.‚ I guess you are good — if you want to get a lot of exer­cise, approach the moun­tain and then go back to your posi­tion and shoot, but it is really for por­trai­ture or still objects.‚ The ambi­ent meter or the inci­dent meter will mea­sure the light falling on the sub­ject.‚ The results you get from this meter are very accu­rate because it actu­ally mea­sures the amount of light falling on the sub­ject.‚ You can get into tricky sit­u­a­tions with the inci­dent light meter as well if dif­fer­ent mixed lights is falling on your sub­ject, but in gen­eral just play with it a lit­tle bit.‚ Again, check out the results either on screen on a dig­i­tal cam­era or when you get your film back and you will see that it is just an absolutely fan­tas­tic, fan­tas­tic device.
Usu­ally, when we use the inci­dent meter, espe­cially in tra­di­tional pho­tog­ra­phy, we are going to mea­sure for the shad­ows.‚ We are going to expose for the shad­ows.‚ If there is a mixed light within the scene, we are going to try and posi­tion the inci­dent meter and we are going to point it at the light source or toward the light source, but in the darker area of the scene if that makes any sense at all.‚ If there is like a bright ray of light shin­ing on the sub­ject at his chest level, you may want to mea­sure the scene below the chest level so that it does not totally blow out the scene.‚ You want to expose for the shad­ows in gen­eral and develop for the high­lights if we are talk­ing tra­di­tional pho­tog­ra­phy.‚ If we are talk­ing dig­i­tal pho­tog­ra­phy, just inci­dent record the scene.‚ Take the metered mea­sure­ment, plug it into your cam­era, shoot, and see what you get.‚ See what you are doing right or wrong.‚ That is really the beau­ti­ful aspect of the dig­i­tal cam­era; you can see the results right away.‚ Again, for any­one that is seri­ously into pho­tog­ra­phy, I highly rec­om­mend get­ting an inci­dent light meter.‚ It is so prac­ti­cal and such a great learn­ing tool and such a great use­ful tool, espe­cially if you are being paid to shoot.‚ Now, again, these inci­dent meters are a cou­ple of hun­dred dol­lars.‚ They are between $200 and $300 to buy them new, but you can often find them used on eBay or you can look in your local paper or go to a local photo store and you will find these meters used as well.
The only other thing I really wanted to men­tion about expo­sure is the dif­fer­ence basi­cally between tra­di­tional cam­eras and dig­i­tal cam­eras.‚ Although the tech­nique of mea­sur­ing the scene will be the same, again, you are going to want to make some small adjust­ments with regard to the meter read­ings that you are get­ting espe­cially if you see that your results are con­sis­tently off.‚ Film man­u­fac­tur­ers and the camera’s speeds, you need to adjust them.‚ They are going to be really good for most appli­ca­tions, but you are going to find that occa­sion­ally the meter read­ing is off and you are going to won­der why.‚ It is because they are not all bang on, you need to adjust them slightly by increas­ing the expo­sure either through expo­sure com­pen­sa­tion in the cam­era or expo­sure com­pen­sa­tion in the meter.‚ You really need to adjust the indi­vid­ual meters if you want to get the best result.‚ You also need to know that when you are doing your tests that although your eye can see the dif­fer­ence in lat­i­tude between the dark­est parts of the scene and the light­est parts of the scene, the cam­era can­not.‚ If there is a really huge dif­fer­ence, the cam­era will not be able to record it prop­erly regard­less of how you are meter­ing it.‚ Now, that is a whole other topic and we can go on and on and on about the fine points of expo­sure, but you need to be aware that if the scene is too bright, your cam­era will not be able to record it regard­less of the meter read­ing that you put in.‚ These types of sit­u­a­tions really only occur with expe­ri­ence.‚ After you have shot many, many pho­tographs, you will be able to real­ize, “Oh my good­ness, this scene is just way too bright.‚ I either can’t shoot this scene and record both sides of the spec­trum, the dark tones and the light tones cor­rectly, or I have to reduce the con­trast of the scene some­how.”‚ Some­times that always will not be pos­si­ble.‚ You need to give it up unless you have such a bud­get whereby you are able to really con­trol the scene with all kinds of equip­ment, then if the scene is too strange in terms of its bright­ness vari­ety, you just have to wait for another time or real­ize it is just not going to work or live with the results you get.
That basi­cally cov­ers our show for today.‚ As always, we appre­ci­ate com­ments in the blog and we also appre­ci­ate com­ments in the forum.‚ We are chang­ing around the blog a lit­tle bit.‚ I hope you like the changes.‚ You can sub­scribe, as always, for free in iTunes.‚ Just do a search for pho­tog­ra­phy pod­cast or Photography.ca Pod­cast and you will find our pod­cast.‚ We are going to have some direct links put up in the blog so that if you just click those links you will be sub­scribed in iTunes, which is a great pod­catch­ing soft­ware to have, so I rec­om­mend you down­load it if you do not already have it down­loaded, but a lot of you prob­a­bly do have it down­loaded.‚ That is it for the today.‚ Thanks so much.‚ We are going to do another pod­cast really quickly.‚ Once every two weeks I am find­ing is bit long, so I intend to actu­ally shorten that period in the very near future, maybe once every 10 days or even once a week.‚ Hope you keep on lis­ten­ing.‚ If you have any ques­tions, shoot them my way.‚ It is my plea­sure to answer them, either via email, via the blog, post­ing in the forum.‚ Always my plea­sure, love talk­ing to new­bies, love talk­ing to pro­fes­sion­als through email or directly.‚ Again, thanks every­one for lis­ten­ing.‚ Have a great day and keep on shoot­ing.‚ Bye for now.
[Cam­era clicks]

Exposure in photography — photography podcast #6

Pho­tog­ra­phy pod­cast #6 is ready for down­load­ing or sub­scrib­ing. In this pod­cast we talk about basic expo­sure in pho­tog­ra­phy. We go through tech­niques involv­ing using a gray card and we talk about reflec­tive, inci­dent and spot metering.

Pho­tog­ra­phy pod­cast tran­script 6

Shooting through glass

This has been some­thing that I’ve been mean­ing to do for a while. Now that I have that new dig­i­tal cam­era, I’m all over it. Great‚effects for fine art photography‚can be had by shoot­ing through dif­fer­ent types of glass and mate­ri­als with dif­fer­ent lev­els of translu­cency. Have I piqued your inter­est? Results will be posted here within 1 week.

Photography projects — length of time

How long should pho­tog­ra­phy projects last? Is there a time limit? Should‚there be a set amount of time? Can it span years, can it span a life­time? Hmmmmmm.

I took this shot this past sum­mer and it is part of‚a project that never seems to end.
Does it even matter?

Photography transcript 5 — Nikon D80 VS Canon 30D — Photography.ca

[Cam­era clicks]

Please note that this is an audio tran­scrip­tion. Gram­mer and punc­tu­a­tion will not be perfect.

Hi there every­one and wel­come to the Photography.ca pod­cast #5.‚ My name is Marko and we are com­ing to you from fan­tas­tic Mon­treal, Que­bec, Canada, on this 22nd of Novem­ber 2006.
So, for today’s show, we are going to go through a lit­tle bit of the jour­ney that I just went through.‚ I was just in the mar­ket for a cam­era and it took me months and months and months and months to decide which cam­era I was going to get.‚ There were a lot of con­sid­er­a­tions for the cam­era and money being one of them, qual­ity being another one, am I just ready to go com­pletely dig­i­tal at this point, all these fac­tors just weigh­ing on my mind day after day, month after month, but after squir­rel­ing away some peanuts for many months I decided to take the plunge and buy a cam­era.‚ So the ques­tion was, which one to buy?‚ That is really what we are going to talk about today, which cam­era did Marko buy?‚ Actu­ally, the two choices were the D80 by Nikon and the Canon 30D.
Before we start, I should tell you that this is just my sub­jec­tive opin­ion on it all.‚ There is no tech­ni­cal test.‚ I did not really mea­sure any­thing.‚ All I did was com­pare the two cam­eras and used my eye to make the best deci­sion pos­si­ble.‚ It was a pretty dif­fi­cult deci­sion for me because I am a Nikon per­son.‚ I have always been a Nikon per­son and I have three lenses that are Nikon so part of the thing was, you can­not use your Nikon lenses in any effec­tive way what­so­ever with the Canon sys­tem and vice versa.‚ Nat­u­rally, my first instinct was to go with the D80.‚ It was in my price range.‚ I was look­ing at about 1100 to 1200 Cana­dian dol­lars and although that is a lot for a cam­era, for sure that is a lot, for some­thing approach­ing pro­fes­sional grade or pro­sumer, those are just what the prices are and after squir­rel­ing away for months I was pre­pared to plunk down the cash.‚ I got to tell you, I bought that cam­era a few weeks ago and I really like that cam­era.‚ It really did it for me.‚ It was really easy to use.‚ It was very intu­itive, espe­cially since I am totally used to the Nikon sys­tem.‚ I love, love the auto focus on it.‚ I love the body.‚ I love the way the con­trol works and I love the way that it worked until ISO 400.‚ I must con­fess that I am extremely, extremely crit­i­cal and at the end of the day it was all about what was going to give me the best bang for my buck at the time I am going to buy it.‚ Obvi­ously, in two months from now or three months from now things will change, but I know a lot of you are prob­a­bly going through a sim­i­lar dilemma, which one to buy, which one to buy.‚ If you want to learn from the ben­e­fit of my expe­ri­ence or take what­ever I have to say with a grain of salt, yahoo.
Back to the Nikon D80, I really, really like this cam­era and I liked it until ISO 400.‚ I did some tests and I did these tests with a good friend of mine, Dominic Fuiz­zotto, who is an excel­lent pho­tog­ra­pher as well and he is kind of a gad­get guy, even more so than I, and we com­pared every­thing at his place using his fan­tas­tic sys­tem, despite my own decent sys­tem, his is bet­ter, what can I say?‚ Any­way, we did it at his place and the D80 was absolutely fan­tas­tic until about 400.‚ Now, when I say absolutely fan­tas­tic until about 400, I am talk­ing about enlarge­ments.‚ What I am talk­ing about is, tak­ing a shot, print­ing the actual result at 8 x 10 or larger.‚ That was really the cri­te­ria for me.‚ If you are going to print at 4 x 5 or you are going to use it for your com­puter, there is no dif­fer­ence between the cam­eras, really.‚ You are going to get great results.‚ Both the Canon and the Nikon, the D80 and the 30D, are amaz­ing, amaz­ing, amaz­ing at 4 x 5 or less.‚ You will never see grain, noise and grain, all these reviews that peo­ple are talk­ing about.‚ You really will not notice it until you blow it up.‚ I really loved the cam­era until ISO 400 because even at 8 x 10 when I made my results and I printed my results, they were fab.‚ They were superb and they were great.‚ How­ever, when I went to 800, I started to notice more noise than my eyes are com­fort­able see­ing and I am a bit of a noise freak and I am a bit of a por­trait freak, so I do por­traits.‚ As I have men­tioned before on the blog, I always focus on the eyes, I get the eyes tack, tack sharp and I love to see detail in the eye­brows, on the eye itself, in the eye­lashes, and I must say that when I was mak­ing my enlarge­ments at 800, ISO 800 or greater, I started to lose detail in the eye­lashes, eye­brows and the eye and I started to see a lot of noise.‚ For those that do not know, noise are those lit­tle pix­i­la­tion effects that you see and to any­one but a trained pho­tog­ra­pher, they will prob­a­bly never notice, but once you get more into any­thing, when you get more into any­thing and you get more fuzzy.‚ So, at ISO 800 and plus at 8 x 10 enlarge­ments, I found that the D80 was not accept­able to my crazy picky eye.
Other advan­tage that the Nikon has over the Canon is it is qui­eter.‚ I really like the fact that it was quiet, whis­per quiet when you click the shut­ter.‚ Another lit­tle thing that I also liked about it, I liked the fact that it kind of had built in mul­ti­ple expo­sure.‚ I do a lot of play­ing and some­what cre­ative pho­tog­ra­phy and it is always just to play with a gad­get from time to time.‚ I do not do it that often.‚ I shoot almost always on man­ual or aper­ture pri­or­ity, but I was kind of into play­ing with the mul­ti­ple expo­sure but­ton just to see what kind of cool effects you can get.‚ The Canon does not have that fea­ture.‚ Of course, you can do any­thing you want in Pho­to­shop so it is not the hugest deal, but it is nice to do stuff in cam­era.‚ Okay, now on to the Canon D30.‚ The Canon D30 is — as you have prob­a­bly guessed that the cam­era I ended up buy­ing and although the motor is not as quiet as the Nikon and although the auto focus is not as amaz­ing as the Nikon, I ulti­mately went with that cam­era because of the noise fac­tor.‚ Once you hit ISO 800 or once you hit ISO 1600 and you com­pare the results side by side — and I am going to put up some pho­tos on the blog so you could com­pare them your­self.‚ These are my pho­tos.‚ Feel free to rip them apart.‚ Feel free to tell me that my tests were inac­cu­rate, but at the end of the day when I com­pare the two side by side to my eye, I found there was con­sid­er­ably less noise in the Canon than the Nikon.‚ Again, this is at 8 x 10 enlarge­ments only.‚ If you are at 4 x 5 or smaller, did not see the dif­fer­ence, both very pleas­ing, both very fine, but at 8 x 10 enlarge­ments and greater, the Canon 30D wins out over the D80 in terms of noise.‚ At the end of the day, again, for me it is all about the sharpest, best pic­ture I can make and the best por­trait that I can pro­duce and for the extra 100 dol­lars or 150 dol­lars — Canon is offer­ing a superb rebate right now, but it still came out to be 100 or 150 dol­lars more for the Canon — I went with the Canon because I am a por­trait freak and when I look at eyes I like them to have all the detail as pos­si­ble.
That was my basic expe­ri­ence, actu­ally.‚ One of the fac­tors that made the expe­ri­ence a bit harder is, again, the Nikon glass.‚ If you are not going to make big enlarge­ments, really, at 4 x 5, every­thing is equal.‚ There is really no need to go buy oppo­site the make that you already have.‚ Sure, I have Nikon lenses and now it is going to cost me a few extra bucks in Canon lenses, but it is because I am crazy picky and it is because of the enlarge­ments.‚ Most peo­ple are not going to make enlarge­ments.‚ Most even pro­sumers are going to keep their images small.‚ They are going to keep them for com­puter, for email, for their web­sites, in which case it just does not mat­ter which cam­era you get because the results are going to be superb.‚ So, I would go with what the other review­ers are say­ing at dpreview.com.‚ They have an absolute, absolute, really thor­ough com­par­i­son on both cam­eras them­selves and then between those cam­eras and other cam­eras.‚ That review is superbly tech­ni­cal and it was one of the sources I went to before I made my deci­sion, but again it is only really about the enlarge­ments as far as my expe­ri­ence tells me.‚ If you have glass from Canon or Nikon, stick with that sys­tem.‚ Do not cross over unless you are a lit­tle bit freak­ishly obsessed.
That sums up my review.‚ I hope it is help­ful to peo­ple.‚ Again, take a look at the pho­tos.‚ Com­pare them side by side, but the best test is going to be your own eye.‚ Buy it from a store that you can return it.‚ Test it first or buy some cards and go to the store and do some tests by your­self.‚ Take one shot with the Canon.‚ Take one shot with the Nikon.‚ Com­pare for your­self.‚ Everyone’s eye is dif­fer­ent.‚ Every­one has dif­fer­ent sub­ject mat­ter.‚ You really need to just com­pare for your­self to get the best test pos­si­ble.
As always, we love to hear com­ments about this pod­cast or stuff you would like to hear in future pod­casts.‚ I got a very nice com­ment on the bul­letin board from a new mem­ber.‚ I think I may have my first groupie.‚ She loves the pod­cast.‚ She just wants me talk about more basic ele­ments, which I am absolutely pre­pared to do in my very next pod­cast.‚ It is just I am so in the thick of this com­par­i­son right now, I wanted to make this com­par­i­son about the cam­era that I ulti­mately ended up choos­ing.‚ The next one will be for my new “groupie,” we will get back to some basics and do a show about more basic pho­tog­ra­phy.
That is it for today, every­one.‚ Thanks very much for lis­ten­ing to the show.‚ As always, please leave com­ments on the blog or inside the bul­letin board on Photography.ca and I will be more than happy to answer those com­ments.‚ Please post some pic­tures at the bul­letin board or you can even post pic­tures as com­ments on the blog and I will be happy to review them as well.‚ Have a nice day, every­one.‚ Keep shoot­ing and we will see you all again or hear you all again or speak to you all again in around two weeks.‚ Thanks every­one.‚ Bye now.
[Cam­era clicks]

Nikon D80 versus Canon 30D — Photography Podcast 5

Pho­tog­ra­phy pod­cast #5 is ready for down­load­ing or sub­scrib­ing. In this pod­cast we dis­cuss the mer­its of both cam­eras and why I chose 1 over the other. Thanks to Dominic Fuiz­zotto for help­ing me with these tests. You can read seri­ously tech­ni­cal com­par­isons of these and other cameras‚at dpreview.com. The images below are from my test. I tried to be as con­sis­tent as pos­si­ble. Note that there are some pro­por­tion dif­fer­ences but that is attrib­ut­able to the fact that the Canon is an 8.2 mega pixel cam­era and the Nikon is a 10.2 mega pixel cam­era. These eyes in these images were cropped from the orig­i­nal ‘raw’ images at 100% mag­ni­fi­ca­tion. They were saved as jpegs at 90% qual­ity, the ISO was 800. At lower ISOs there was no difference.

Pho­tog­ra­phy pod­cast tran­script #5

Photography transcript 4 — Fill flash — Photography.ca

[Cam­era clicks]

Please note that this is an audio tran­scrip­tion. Gram­mer and punc­tu­a­tion will not be perfect.

Hi there every­one and wel­come to the Pho­tog­ra­phy Pod­cast on Photography.ca.‚ My name is Marko and we are com­ing to you from Mon­treal, Que­bec, Canada, on this Novem­ber 2, 2006.
It is a beau­ti­ful sunny day in Mon­treal, albeit cold, and sunny days are a great time to talk about fill flash.‚ This whole pod­cast is actu­ally inspired by a new mem­ber that posted some pretty inter­est­ing pic­tures on the Photography.ca bul­letin board.‚ I quite like those pic­tures, but I thought that those pic­tures could be even bet­ter if they would have just used a lit­tle bit of fill flash.‚ In a nut­shell, what fill flash is, is it fills the shad­ows of scenes and it is par­tic­u­larly use­ful in por­trai­ture.‚ So even on a sunny day, which may seem counter-intuitive, a great thing to do is use a bit of fill flash. ‚What hap­pens is the sun, espe­cially when it is high above, will hit the subject’s head and cast like a shadow in their eyes and on their nose and it is not attrac­tive at all.‚ So, you have this per­son with dark cir­cles under their eyes and it is really not so flat­ter­ing and some­times it is really dis­tract­ing.‚ What is a really good thing to use is fill flash.
Now, most mod­ern SLRs and dig­i­tal SLRs have the abil­ity to use fill flash.‚ Some­times you can use fill flash on the lit­tle flash that comes with the cam­era or if you have an actual cam­era that you mount on your flash via the hot shoe, you can def­i­nitely use fill flash there.‚ It is such a sim­ple pro­ce­dure.‚ All you have to do is turn on the flash and fire the cam­era and there you go, you have fill flash.‚ You should know what set­tings you are on.‚ You could be on a man­ual set­ting, you could be on a more auto­matic set­ting, but even in the sun, take a pic­ture of a per­son and use the flash.‚ What is going to hap­pen is that flash is going to fire at the per­son and it is going to fill their face with a bit of light and gen­er­ally it will make the pic­ture more attrac­tive.‚ Actu­ally, for this pod­cast, we are going to put up a cou­ple of shots on the blog with and with­out fill flash and you can kind of see the dif­fer­ences.‚ Now the inter­est­ing thing about fill flash is that you can vary the amount of the fill flash.‚ What most peo­ple will do is they will put it on an auto­matic — they will put their cam­era rather on an auto­matic set­ting, turn on the flash and just shoot and although gen­er­ally that is bet­ter than not using any fill flash at all, espe­cially on a bright sunny day, it is not the best thing pos­si­ble.‚ It has been my expe­ri­ence that the best shots or gen­er­ally very good shots that use fill flash have the fill flash used at a strength that is less strong than the ambi­ent light.‚ That is to say, the light that is light­ing the sub­ject, the nat­ural light, let us say, well, the fill flash should be less strong than that light.‚ What hap­pens is if the fill flash is at the same strength as the light that is nat­u­rally light­ing the sub­ject or the ambi­ent light, it does not quite look as flat­ter­ing as it could.‚ If the fill flash is stronger than the sub­ject, well, then it is not even called fill flash any­more.‚ That is really the main light for the sub­ject and that makes the sub­ject.‚ Unless you are look­ing for a spe­cific effect, it makes it look less pleas­ing than nor­mal.
That said, for that spe­cial effect, I mean you will see this all the time in fash­ion or fash­ion mag­a­zines where the model is just blasted with light.‚ She is flaw­less gen­er­ally and they will retouch her for hours after­wards and she will look good, but it is not gen­er­ally the most nat­ural look for gen­eral pho­tog­ra­phy I would say.‚ A good thing to do is read the cam­era man­ual and fig­ure out how to adjust the flash.‚ It is usu­ally under some­thing called flash com­pen­sa­tion or fill flash, but it is gen­er­ally really easy to do and what you want to do, again, is let us say you are using the lit­tle flash on the cam­era, you just want to lower that by one or two or three stops even and what that will do is it will just add a touch of light to your sub­ject and light them in a very pleas­ing way.‚ If you were to use, let us say, minus one stop of light from the flash, what the flash is doing is it is cal­cu­lat­ing the amount of light in the scene that is nat­u­rally there and then it is giv­ing you one stop less, minus two gives you two stops less, minus three gives you three stops less.‚ These flashes can work in dif­fer­ent fash­ions, it could work by stops or other incre­ments but what looks very nat­ural or more pleas­ing, let us say, is when there is less light com­ing from the flash than the actual light that is light­ing the sub­ject.
Per­son­ally, when I use fill flash, I almost always choose, let us say, minus one and a half or minus two stops of light, so I am just giv­ing the sub­ject a lit­tle bit of light, but I am not accen­tu­at­ing the light from the flash so it tends to look more nat­ural.‚ If you have a hot shoe mounted flash or a more pro­fes­sional flash that you mount on the cam­era, it will usu­ally be really, really easy to fig­ure out how to give less fill flash or neg­a­tive flash, let us say.‚ There are some arrows or there is some but­ton that allows you to do plus a third of a stop, plus two thirds of a stop, plus one stop, or minus a third, minus two thirds, minus one, minus two, minus three, etc., and you could just play with those and see the effect that you are going to get.‚ In fact, I highly rec­om­mend, espe­cially if you are not so famil­iar with fill flash, is to just go ahead and exper­i­ment, as always.‚ Take a shot with the reg­u­lar flash set­ting, just turn it on and shoot, see what you get.‚ Minus it by one stop of light, shoot it, see what you get.‚ Minus it by two stops of light shoot it, see what you get.‚ Com­pare all three and see which one is most pleas­ing for you.‚ It would be my guess that those shots that are minus one to minus two, they might well be the most pleas­ing shots, they cer­tainly are to me, but every­one is dif­fer­ent.‚ Of course, if you are going for the exact oppo­site effect, you could choose what­ever you want, but then I would sug­gest to you it is not called fill flash at all.‚ If you go plus one or plus two stops of light from the flash, you are doing the oppo­site, you are get­ting a cool effect if that is what you want, but then it is not called fill flash.‚ That is your main light and the main light is light­ing the sub­ject and the ambi­ent light is actu­ally act­ing as a sec­ondary light.‚ It is no longer the main light.‚ You can also, of course, use fill flash from sec­ondary sources of light by either hav­ing a sec­ondary flash some­where or a sec­ondary light some­where, but if you are already at that level, then you pretty much already know what you are doing.‚ I guess this par­tic­u­lar pod­cast is geared for just using your cam­era to add some extra light to the faces of some­one.‚ We are talk­ing in par­tic­u­lar about por­traits because it is really hard to fill flash or to use fill flash on a land­scape scene.‚ Flash typ­i­cally has a very short range or rea­son­ably short range and if you are tak­ing pic­ture of a moun­tain or any­thing like that, well, your flash will just never hit the moun­tain, it will never make a dif­fer­ence.‚ That is why it is par­tic­u­larly use­ful for por­trai­ture or even close up pho­tog­ra­phy, but pho­tog­ra­phy that is rel­a­tively close to the cam­era as opposed to land­scape or scenic pho­tog­ra­phy.
That cov­ers it for today’s show.‚ It was a really short show.‚ I will be putting up some pho­tographs on the blog that go along with the show notes and you could really see the dif­fer­ence by using minus one and minus two as opposed to the nor­mal shot and as opposed to no flash at all.‚ I am going to put those up so peo­ple can see the dif­fer­ences and hope­fully learn from them.‚ As always, if you are able to com­ment or choose to com­ment it is so appre­ci­ated and if you are inter­ested in hav­ing your pho­tographs cri­tiqued, well, just join the bul­letin board on Photography.ca, upload a cou­ple of pic­tures and it is absolutely my plea­sure to cri­tique them.‚ In fact, I would like more mem­bers to cri­tique them as well, but each and every shot that gets uploaded that peo­ple want cri­tiqued, it gets cri­tiqued by me.‚ I have a lit­tle bit of expe­ri­ence so I hope the tips that I have given other peo­ple thus far have been use­ful and appre­ci­ated.‚ Well, that is it for us again.‚ This was our fourth pod­cast on Photography.ca.‚ We hope you enjoyed it.‚ As always, you can leave com­ments on the blog or through the bul­letin board and we will be back in two weeks’ time to do another pod­cast.‚ Thanks so much for lis­ten­ing every­one and happy shoot­ing!
[Cam­era clicks]

Photography transcript 3 — Traditional photography versus digital photography — Photography.ca

Please note that this is an audio tran­scrip­tion. Gram­mer and punc­tu­a­tion will not be perfect.

Hi there every­one and wel­come to the Pho­tog­ra­phy Pod­cast on Photography.ca.‚ My name is Marko.‚ We are com­ing to you from Mon­treal, Que­bec, Canada, and today is Octo­ber 12, 2006.‚ For today’s show, this is going to be really an opin­ion piece.‚ I am going to give you my opin­ion on one of the most com­mon emails I get and that email is, “Which is bet­ter, tra­di­tional pho­tog­ra­phy or dig­i­tal pho­tog­ra­phy?”‚ I am going to give you my opin­ion.‚ I am going to give it to you straight up.‚ I am going to give it to you not like the neu­tral Cana­dian that so many peo­ple think we are.‚ I am going to give you my hon­est opin­ion on it and I am going to get into it now.
The ques­tion that comes to me directly is, “Is dig­i­tal pho­tog­ra­phy bet­ter than tra­di­tional pho­tog­ra­phy?” and my answer flat out is no.‚ Dig­i­tal pho­tog­ra­phy is not bet­ter than tra­di­tional pho­tog­ra­phy, period.‚ So, then the ques­tion comes, “Should you switch to dig­i­tal pho­tog­ra­phy?”‚ My answer on that one is yes prob­a­bly you should unless you are a fine art pho­tog­ra­pher.‚ If you are a fine art pho­tog­ra­pher and you love the process, you love work­ing in the dark, you love print­ing your own pic­tures espe­cially, you love the dark room, you love the red light, you love the smell of fixer, well then, do not switch, then stay tra­di­tional, then get into you dark room and work your magic.‚ In that case, it is really about the process.‚ It is really about the craft.‚ It is really about print­ing by hand and you know what, in that case, there is noth­ing like the magic of shin­ing that light through the enlarger on to the paper, you take that paper, you run it through the liq­uids and the image starts to mag­i­cally appear.‚ It is magic.‚ It is magic.‚ You know what it is going to look like.‚ You know when you are get­ting a good print.‚ You run it through the rest of the liq­uids.‚ You take it out­side and see the result.‚ It is pure magic.‚ It is pure craft.‚ You know what, in that respect, dig­i­tal pho­tog­ra­phy can never touch tra­di­tional pho­tog­ra­phy.‚ There is more of a jour­ney from the sil­ver located on the film to the end result.‚ It is not so quick.‚ It is not so easy.‚ It is harder.‚ It is more like your baby, your child, your mas­ter­piece and in that respect, again, tra­di­tional wins.‚ You can­not com­pare.‚ Tra­di­tional wins.
I would also like to sug­gest that just from a busi­ness per­spec­tive, if some­one is try­ing to sell their prints and it is tak­ing them hours and hours and hours to make 10 selec­tive prints, I would sug­gest to you that if that is all that they are doing, that those prints are going to be worth more.‚ This is just my opin­ion again, but it took them longer to make those prints.‚ Maybe those prints are num­bered, but they did not have to press a but­ton, they worked like crazy to get each print.‚ I guess the argu­ment can be made that, yes, you are also work­ing in front of your com­puter.‚ It takes time.‚ I agree that, yes, it takes time, but once you have your mas­ter­piece print, once you have color cor­rected it and Pho­to­shop it to the nth degree, you can make as many copies as you want and those copies can be beau­ti­ful.‚ Do not get me wrong, I have made beau­ti­ful prints.‚ I love to see beau­ti­ful prints.‚ At the end of the day, a beau­ti­ful print is a beau­ti­ful print, but there is just some­thing more mag­i­cal when you did it actu­ally by hand in the dark room.‚ That is just my opin­ion.‚ Feel free to tell me I am wrong.
Okay, but what if then you are a pro­fes­sional pho­tog­ra­pher or a seri­ous ama­teur pho­tog­ra­pher?‚ You might be into fine art, but not nec­es­sar­ily.‚ You are more into cap­tur­ing the feel, you are more into tak­ing sou­venir pho­tos, you are more into doing a job with the pho­tos, mak­ing money from the pho­tos, well then, my best sug­ges­tion is go dig­i­tal.‚ Dig­i­tal is just so much eas­ier in that respect.‚ With dig­i­tal, you could take as much time as you want.‚ You could take as many shots as you want plus one of the most, most desir­able aspects of dig­i­tal pho­tog­ra­phy is the fact that you can see the results right away, which makes it a superb learn­ing tool.‚ Let us say you are tak­ing a pic­ture of a White man in a white suit on a white wall, well, your cam­era is designed to ren­der that pic­ture, to ren­der that scene as a medium tone.‚ It aver­ages out the scene.‚ So, your cam­era more likely than not, is going to give you a gray­ish result.‚ It is not going to give you that white result.‚ When you see that image after you have taken it, right away you see that it is gray­ish and that just makes it a great learn­ing tool. ‚You take a shot, you do not like what you see and then you won­der why it did not turn out prop­erly.‚ There is noth­ing like the instant feed­back of dig­i­tal in that regard.‚ If you are a pro already and you know what you are doing, well then, you just cap­ture the scene.‚ You have got it on your card or what­ever media you recorded it on.‚ You can manip­u­late it, you can send it wher­ever it needs to go and it is done, it is a done deal.‚ If you are lucky enough to have some­one work­ing for you, you just give them the card and let them deal with it.‚ It is just so much eas­ier in that respect.‚ Is it faster?‚ Is it always faster?‚ Well, is it faster?‚ The answer is some­times yes, some­times no.‚ Okay, I am hedg­ing.‚ I am hedg­ing.‚ I am not giv­ing you the clear answer.‚ Let us say you are a wed­ding pho­tog­ra­pher and you are still shoot­ing tra­di­tion­ally, you are shoot­ing on film, well, after the end of the day, you take your shots, you give them to the lab and it is done.‚ There is noth­ing you need to do.‚ You get that proofs.‚ If you are a dig­i­tal wed­ding pho­tog­ra­pher, well then, that is def­i­nitely not the end of it because you have all these dif­fer­ent scenes shot under dif­fer­ent lights and then you have to bal­ance them all.‚ Hope­fully, you are not going to be print­ing your­self.‚ You are still going to give them to the lab, but you have to bal­ance them some­what before you give them to the lab.‚ It is not done.‚ There is still work to be done.‚ So, in that respect, in terms of speed, it really depends on what you are using, what job you are doing and where you are going with it, then some­times, yes, it is faster and some­times not.‚ Surely if you are a fine art pho­tog­ra­pher and you are shoot­ing in black and white or color and you are print­ing them your­self, then there is no way it is going to be faster, but in that case again, it is more about the jour­ney than about effi­ciency.
I guess another rea­son why you would want to switch is, unfor­tu­nately, the sad truth is film is on its way out.‚ Tra­di­tional pho­tog­ra­phy, unfor­tu­nately, is on its way out.‚ It is still going to be around for a cou­ple of years, but more and more film man­u­fac­tur­ers are stop­ping to make their clas­sic films.‚ There are plenty of good exam­ples.‚ I do not want to start get­ting all weepy, but there are loads of films that are not being pro­duced any­more and that num­ber is just going to dimin­ish and dimin­ish as dig­i­tal takes hold of the minds of peo­ple.‚ It is sad to say that even though for some appli­ca­tions, tra­di­tional pho­tog­ra­phy is bet­ter.‚ When you are talk­ing about low light sit­u­a­tions, the newer cam­eras, the newer Nikons, the newer Canons, they do not nec­es­sar­ily han­dle low light all that well.‚ You get all kinds of noise in your pic­ture when you do not want it.‚ It is harder to deal with.‚ Low light in tra­di­tional pho­tog­ra­phy is bet­ter, but on a whole, if the film stock is on its way out and every­body is chang­ing, you kind of have to go with the times unless you are that fine art pho­tog­ra­pher again.‚ Beta was bet­ter than VHS.‚ There is a strong argu­ment that Ogg Vor­bis is bet­ter then MP3, but MP3 is every­where now and VHS, okay, we can­not deal with VHS, but you could not be one of the few peo­ple that like Beta, that stuck with Beta‚¦‚ Oh, my God.‚ Am I show­ing my age now?‚ The point being is tra­di­tional is on its way out, so you really should not be spend­ing money on tra­di­tional cam­eras unless you are just like learn­ing.‚ You can buy an inex­pen­sive cam­era, you are learn­ing pho­tog­ra­phy, but for the big bucks, when you are really ready to spend money on gear, I guess I would rec­om­mend going dig­i­tal.
All right, so the next ques­tion goes, “Okay, Marko, you are rec­om­mend­ing that most peo­ple go dig­i­tal.‚ Which dig­i­tal cam­era should I get?”‚ Ah, this one is clear.‚ This one is def­i­nitely clear.‚ You want to get a dig­i­tal SLR.‚ You do not want to get a point and shoot.‚ You want to get an SLR, some­thing where you can adjust the focus, you can adjust the aper­ture, you can change lenses, you can adjust the shut­ter.‚ These cam­eras are just far more ver­sa­tile.‚ You can do what­ever you need with them.‚ My rec­om­men­da­tion is do not go all out at first.‚ Buy a cheaper one.‚ Get a used one, go to a cam­era shop, go on eBay.‚ Get a used one first until you know what you are doing.‚ Do not spend the big bucks yet.‚ Good dig­i­tal cam­eras on a pro­sumer level, they can cost you $1500, $2000, or more when you start adding good lenses and flashes.‚ Do not spend that money at the begin­ning.‚ Get some­thing much cheaper.‚ Get some­thing used at the begin­ning, learn with it and then your next cam­era, that is when you can spend the bucks if you are still into it.‚ So many peo­ple buy cam­eras with all the bells and whis­tles and they are not into it, they still do not know if they like it, they still do not know if they need it.‚ So, why spend the cash at that point?‚ Just buy what you need.‚ Buy some­thing not too expen­sive and grow after that.‚ You can still sell that cam­era as well or use it as a backup.
So, I guess that cov­ers it.‚ I guess I just wanted to basi­cally respond to the e-mails that I keep get­ting, “Which is bet­ter, tra­di­tional or dig­i­tal?”‚ Put it to bed once and for all.‚ I guess this is just in terms of my opin­ion.‚ It is not the offi­cial answer.‚ It is not gospel.‚ I do not even know if I am right, but it is my opin­ion and I am enti­tled to it, darn it.‚ That is it for today’s show.‚ As usual, please we love it if you will leave some com­ments.‚ That would be so much appre­ci­ated.‚ This time, we have our own ded­i­cated blogs, so you could leave the com­ments on the blog.‚ The link is at Photography.ca and it is my plea­sure as always to get com­ments on any­thing on this show or other shows or if you have any ideas for future shows as well.‚ So, thanks for lis­ten­ing every­one.‚ We will see you again in approx­i­mately two weeks.‚ My name is Marko.‚ We hope you enjoyed the show and happy shoot­ing.‚ Bye everyone.