Photography podcast #130 reviews the Big Stopper by Lee filters. The big stopper is a 10 stop glass filter that slows down shutter speeds in order to accentuate movement. Both clouds and water are classic subjects for use with this filter and the resulting photographs tend to be ethereal and dreamy. Aside from reviewing the filter, I offer up 6 tips on how to use it effectively.
Thanks to The Camera Store (The largest camera store in Calgary, Alberta, Canada) for sponsoring the Photography.ca podcast.
Click the player at the end of this post to listen to (or download) the 18ish minute podcast.
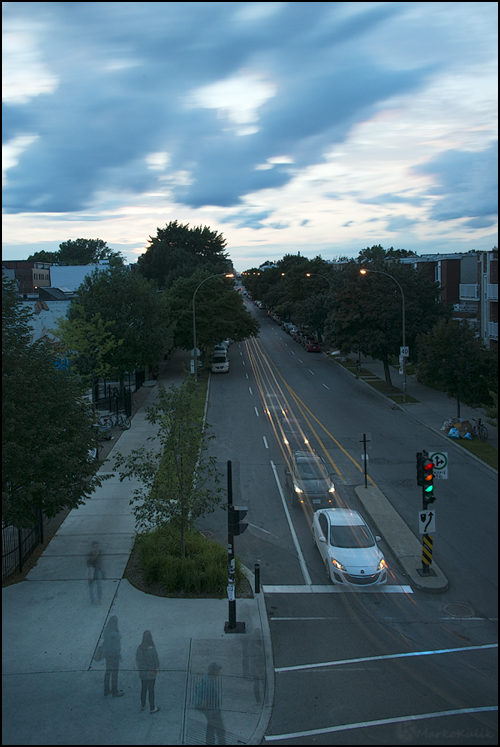
This evening image of Rue Laurier in Montreal is a long exposure image using the big stopper. You can see movement in the clouds, and in the cars. The people look ‘ghostlike’ because they moved (somewhat) in place while waiting for the traffic light. Notice the traffic light has all 3 colours lit because the traffic light cycled during this 30 second exposure. Exif data — ISO 100, f/11, 30 second shutter speed.
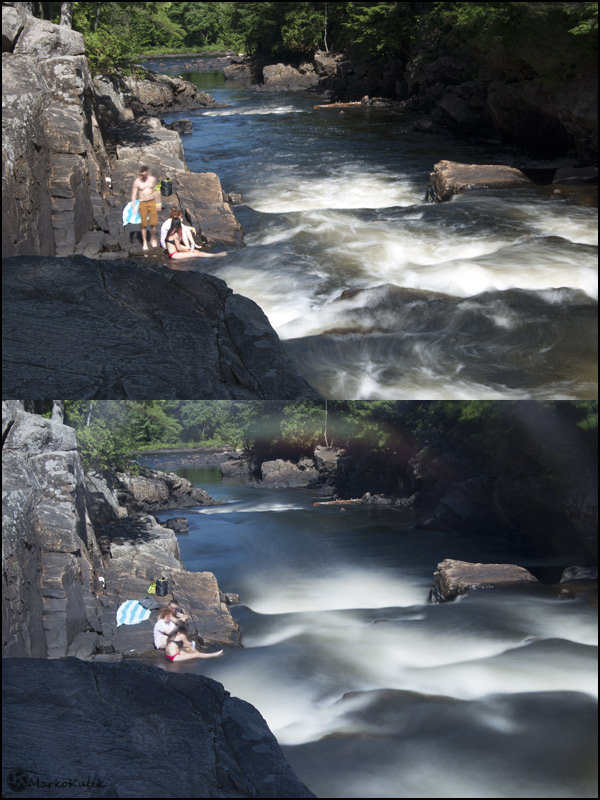
Fast moving water at Chutes Dorwin in Rawdon, QC. Canada. In the top image I used my lowest ISO (50) with my smallest aperture (f/32) and this yielded a shutter speed of .4 seconds. The water does look dreamy. But when I used the big stopper, I was able to get much slower shutter speeds and the lower image was exposed for 15 seconds. It’s much dreamier and more ethereal looking but the filter must be used with care. If you look at the top of the bottom image you can see a rainbowish arc and this where flare entered my camera. As discussed in the podcast, this is easily solved with a hat (or postprocessing).
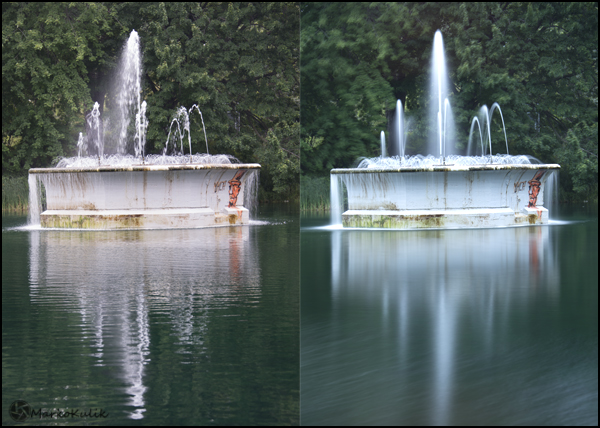
Fountain at Parc Lafontaine in Montreal, QC., Canada — The slowest shutter speed I could get without a filter was 1/60 in this light. When I put the big stopper on, It extends the available shutter speeds big time. The image on the right was a 15 second exposure using the big stopper and look how dreamy the water looks.
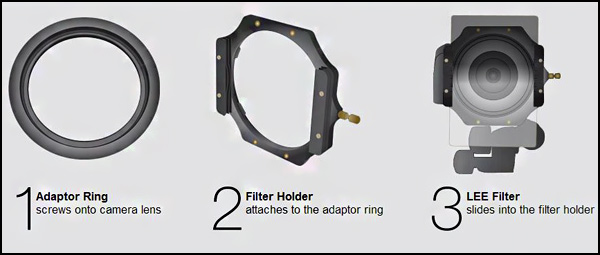
How the Lee filter system works
Links /resources mentioned in this podcast:
Podcast 77 - On Neutral density filters and graduated neutral density filters
Podcast 84 - Back Button autofocus
The big stopper at The Camera Store
Regular forum assignment — Repetition
Level 2 photography assignment — Forced perspective
If you liked this podcast and want to review it on Itunes, this link gets you to the main page
If you are interested in writing for our blog please contact me photography.ca ( A T ) G m ail Dot co m (using standard email formatting)
Please join the Photography.ca fan page on Facebook
My Facebook profile — Feel free to “friend” me — please just mention Photography.ca
My Twitter page — I will follow you if you follow me — Let’s connect — PLEASE email me and tell me who you are in case I don’t reciprocate because I think you are a spammer.
If you are still lurking on our forum,
feel free to join our friendly ![]() Photography forum
Photography forum
Although ALL comments are appreciated, commenting directly in this blog is preferred.
If you are looking at this material on any other site except Photography.ca — Please hop on over to the Photography.ca blog and podcast and get this and other photography info directly from the source. |Subscribe with iTunes|Subscribe via RSS feed |Subscribe for free to the Photography podcast — Photography.ca and get all the posts/podcasts by Email
You can download this photography podcast directly by clicking the preceding link or listen to it almost immediately with the embedded player.
Thanks for listening and keep on shooting!
Podcast: Play in new window | Download


When I first began using the mega stop ND filters, I started with the 77mm b+w as it was a fit for my Tamrom 10-24mm and Nikkor 16-35mm. What I discovered was that with the use of step down rings, I could greatly reduce vingnetting when using the filter on lens with smaller filter threads.(i.e. 77mm filter on 67mm threaded lens) That led me to purchase the larger 82mm version and more step down rings for use with most of my lenses. Let’s me get at the sweet spot of the filter. Not a perfect solution, but.…
There are some neat apps out there to help with calculating the exposure time. ND Timer is the one I use.
I have been listening for some time Marko, nice to add a different perspective.
I have been using and loving the B+W ND filters. I do not find too much of an issue with vignetting. I have used it on a 10–22 Canon EFS on a full frame camera so really the I can only go as wide as 14mm. The advantage of the screw on filters is there is less chance for light sneaking in. I have both the 10 stop ND3.0 and 3 stop ND .9 filters. Star trails, waterfalls and sweeping landscapes are great subjects. Worth every dollar spent! I cringe when people talk about the cheap knock-offs or variable NDs that are subject to extreme colour cast or banding. Best to stick with the premium brands like Lee and B+W to name two.
Thanks much for your tip on covering the viewfinder, totally slipped my mind. It may help with lighting issues I have with some of the work I do. I will test on a photo shoot tomorrow. I always have gaffer tape in the bag.