Multiple exposure in photography (digital and film)
 Multiple exposure allows you to record two or more different scenes on the same frame of film or on the same digital file. You must make sure that your camera can do this, and you must read your instruction manual to discover the settings that control multiple exposure for your particular camera. Most older manual cameras as well as most medium to higher end digital cameras are capable of producing multiple exposures.
If your digital camera can take multiple exposures you will find that it can produce very artistic results quite easily. Usually you have to go into the camera’s menu settings and select multiple exposure as well as select how many exposures you’d like to make/take.
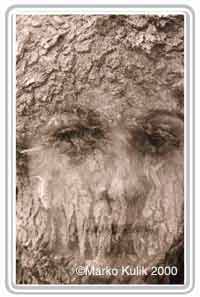
Many camera models will have an ‘auto-gain’ field and you will have to choose on or off. The auto gain (when set to ‘on’ ) blends the exposure information for each frame that you take to give you 1 properly exposed digital file made of 2 or more exposures. Each exposure that you make contributes to the final exposure equally. If we take the image that accompanies this article for example, we can see a face in a tree made from 2 images. With the auto-gain set to on, the face gets exactly half the exposure and the tree the other half. If you are happy with that, you are golden. Let’s say that you want the tree darker than the face though, that’s where it gets trickier. When it is only 2–3 multiple exposures you can use exposure compensation in the semi-automatic modes or work in manual mode and tweak how much exposure each frame gets that way. But once you are at 4 or more exposures it can really get confusing to add different levels of exposure compensation on each frame. In these cases it might be more precise to set the auto-gain to off and figure out how much ‘weight’ each of the multiple exposures should contribute to the final exposure.
When the auto-gain set to off, you the photographer have to figure out the math and make exposure adjustments to blend the 2 or more separate exposures. If you don’t do the math and make adjustments, you will simply be adding exposures one on top of the other and the final image will be overexposed. The more multiple exposures you make without adjusting the exposures, the greater the overexposure on your final digital file. That said, for those that want to do the math, each of the exposures you make can be fine tuned in order to get a greater degree of precision. Use Method A below for film cameras to help figure this out for your digital camera, the math is the same.
If you are still shooting film here are 2 easy methods for producing multiple exposures:
Method A
Basically the formula is like this. Each of the multiple images on your frame of film becomes a fraction of the total exposure of the frame. So for instance, the shot in this article is made up of 2 images, a model and a tree. The exposure for the model as determined by the camera’s meter was 1/60 at f-8. The exposure for the tree was also 1/60 at f-8. Now because you’re putting another image on the same frame, each image should be exposed at half the total exposure.
Therefore to put half of the tree, I shoot the first exposure at 1/125 of a second, (this lets in half the amount of light as 1/60). Then I shoot the next scene, the model, ON THE SAME FRAME OF FILM-CONSULT YOUR MANUAL TO LEARN HOW TO DO THIS. To shoot the model I also expose the film 1/125 of a second. If the camera meter had given a different exposure for the model, say F-8 at 1/125, I would have needed to HALVE that exposure and I would have used F8 at 1/250 (which lets in half as much light as 1/125) Alternatively I could have adjusted the aperture to let in half as much light, in which case the exposure would have been F11 at 1/125.
Method B
Now that you understand the theory lets make it easier. There a a few ways to play with exposure. One of the easiest ways is by changing film speeds. Read The Trinity of all Photography to understand why. If the ISO on the film box says 100, at ISO 100 you can expose 1 frame correctly. But at ISO 200.… you can expose 2 frames correctly since each frame of film is getting half the recommended exposure! At ISO 300 you can expose 3 frames correctly etc. In the model/tree example, using method B all I would have done was set my 100 film to 200 and shot each scene at the cameras RECOMMENDED exposure. So.…before you take your shot, determine how many multiple exposures you will take, and set the ISO accordingly. One caveat.….MAKE SURE YOU SET THE ISO BACK TO ITS ORIGINAL SETTING AFTER THE MULTIPLE EXPOSURE SHOTS.
Creative tip: Most multiple exposure prints look busy and abstract if too many exposures are used. Try using two or three to start. Then experiment.…and use as many as you like.


